Table of contents Custom Containers
(BETA FEATURE)
Updated over a week ago Table of contentsThe Custom Containers feature enables users to host their own proprietary models through the Renewable Suite’s infrastructure. For Renewable Suite users that are already utilizing data science and domain expertise to extract insights and bring attention to specific events, this feature can enable synergies with the Renewable Suite. This saves cost and time by simplifying model infrastructure requirements, centralizing notifications, and leveraging data APIs. Whether you are looking to retain proprietary nuances in your notification rules or simply looking to leverage existing models, you can generate notifications on the Renewable Suite without exposing your code or algorithms to anyone outside your organization.
Custom Containers utilize Notifications to post results of a user’s model. Below are the steps to creating and deploying your container as a Notification Rule.
-
Write your code utilizing required format (sample script provided)
a. Query Data using Renewable Suite’s APIs
i. Requires API key with necessary configurations
b. Create and update notifications using Renewable Suite’s APIs
c. Utilize parameterized variables to expose values on the Renewable Suite UI. -
Create a Docker Image
a. Requires Docker setup on local computer -
Create your Notification Rule that will run your Docker Image according to your specifications for an asset.
-
Receive notifications according to your model and notification settings!
Write your code utilizing required format (sample script provided)
a. Query Data using Renewable Suite’s APIs
i. Requires API key with necessary configurations
b. Create and update notifications using Renewable Suite’s APIs
c. Utilize parameterized variables to expose values on the Renewable Suite UI.
Create a Docker Image
a. Requires Docker setup on local computer
Create your Notification Rule that will run your Docker Image according to your specifications for an asset.
Receive notifications according to your model and notification settings!
It is helpful to familiarize yourself with steps 3 and 4 before writing your code. This helps to understand what information is defined in the Rule on the UI and gets passed to the Custom Container as well as gaining ideas around how to utilize the output Notification’s activity timeline fully.
Write your Code
You have full flexibility over your code as long as it is written in Python and follows standard formats for data inputs and posting results. You have the option to parameterize variables that would be helpful to have adjustable through the UI without having to update and re-deploying your model.
Code Structure
In the example code downloadable HERE and is recommended to review as you read through this documentation. The example code is a Custom Container that runs the following rule:
-
For a wind asset, if wind speed_avg > 10 and active power_min < 100 for a device for at least 2 consecutive timestamps, generate a notification specifying that device is offline (or update a notification that is already open). *
For a wind asset, if wind speed_avg > 10 and active power_min < 100 for a device for at least 2 consecutive timestamps, generate a notification specifying that device is offline (or update a notification that is already open). *
The rule is specified in the function run_rule in the sample code and called within the main function. The main function must take 2 arguments, event and context. The main function is called handler in the sample code but can be called anything as long as it is referenced as such in the Dockerfile. The event argument accesses inputs specified on the UI in the rule utilizing the Custom Container; these include asset ID, parameters, API Key, and subscribed emails. Make sure you assign these values to the variables your code utilizes elsewhere. The context argument holds information about the invocation and execution environment for your container. You will not need to modify this argument anywhere in your code.
The sample code contains several functions that are likely useful to incorporate into your code as is to help feed data into whatever version of run_rule you decide to code. Data must be queried using Renewable Suite APIs and therefore ensuring correct timezones, asset IDs, device IDs is necessary. Rather than looking these up on the UI and hardcoding them, the following functions allow APIs to be used to find these given the asset name passed in from the UI when creating the rule.
-
get_asset_timezone_info returns up what timezone preference (asset or UTC) and the asset’s timezone for the asset ID specified which is what data needs to be queried in for Renewable Suite APIs.
-
_convert_to_asset_time _which is useful if the timezone preference is asset time and you are coding based on UTC.
-
get_all_devices_for_asset returns a JSON of all device information for that asset and get_device_names_and_ids converts this to a dictionary with device IDs that can be used in the APIs to query data.
get_asset_timezone_info returns up what timezone preference (asset or UTC) and the asset’s timezone for the asset ID specified which is what data needs to be queried in for Renewable Suite APIs.
_convert_to_asset_time _which is useful if the timezone preference is asset time and you are coding based on UTC.
get_all_devices_for_asset returns a JSON of all device information for that asset and get_device_names_and_ids converts this to a dictionary with device IDs that can be used in the APIs to query data.
Querying Data
For the container to be deployed in the Renewable Suite environment, it must utilize the data within that environment by using the Renewable Suite APIs.
API documentation is available HERE for all different types of raw, processed, and calculated data. Some commonly useful endpoints are Query for 10min aggregate device data, Historian for raw data, and Alarms data.
APIs require an API Key along with necessary configurations. Documentation on requesting, reviewing, or configuring API Keys can be found HERE. Make sure that your API is configured to access not only the tables with the data but the metadata tables that are used (like the ones described above used for accessing device IDs and timezones).
The sample code shows the get_data function using the 10min device data from the Query API. The main function checks for available data before calling the run_rule function which is recommended to avoid the code failing due to unavailable data.
Notification Results
Results must be written in the form of a notification and will leverage the notifications UI to post results. There are GET, PUT, and POST API documentations for reading, updating, and creating notifications respectively.
Notifications have an activity timeline with information about the event as well as a notes log for updated information. Each notification posted from a Custom Container could be updated via the API or updated directly from the UI.
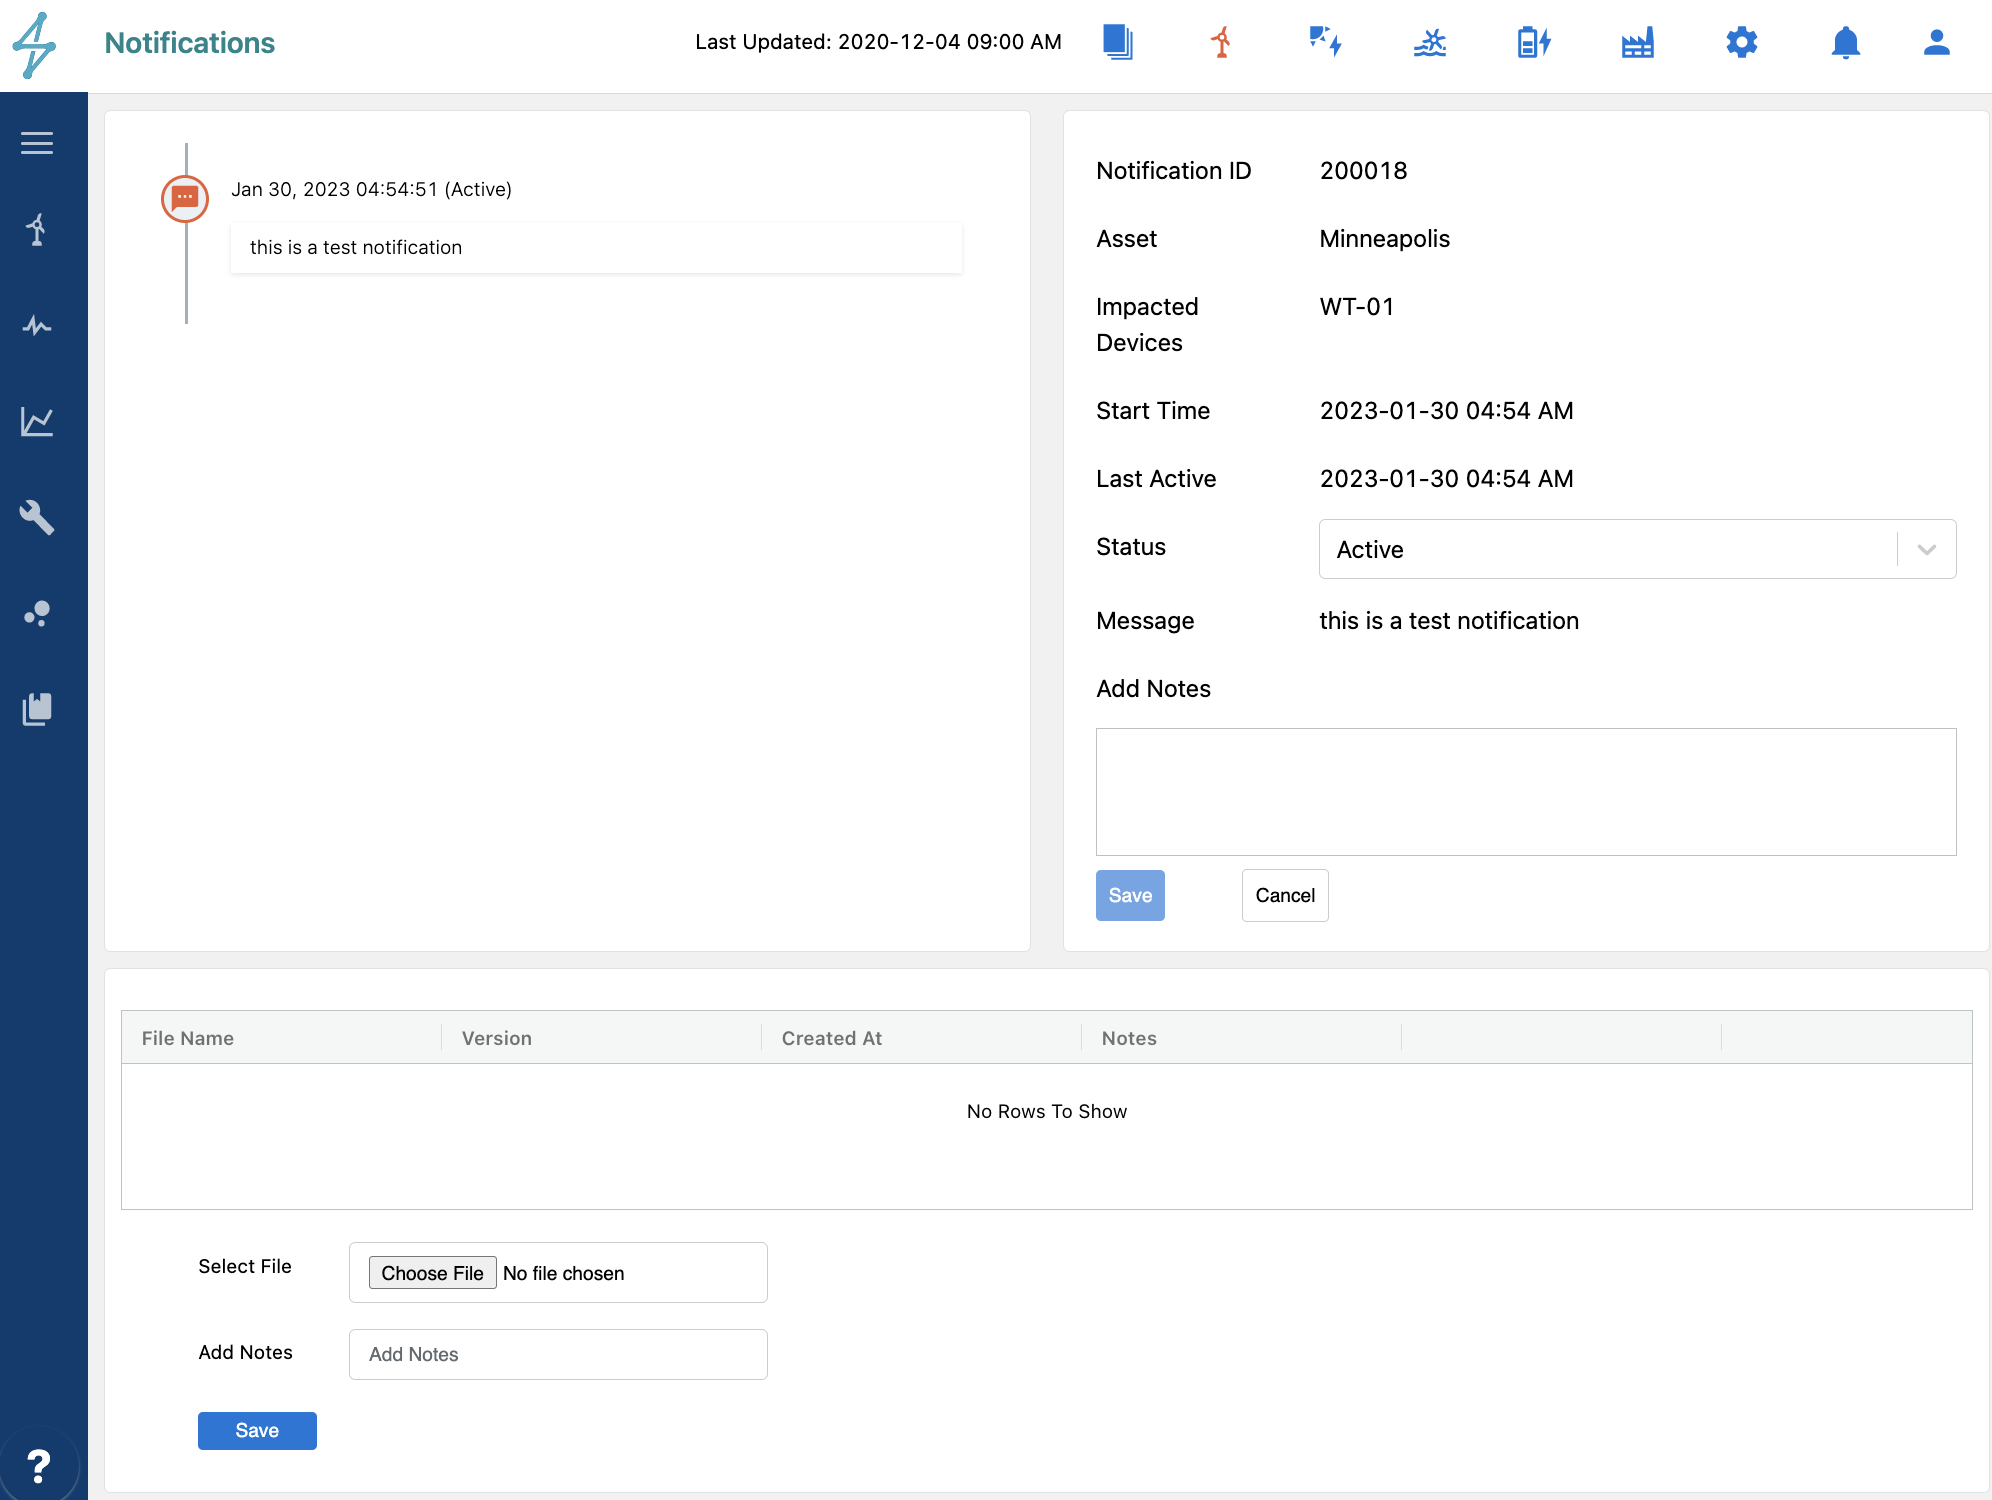
The sample code’s run_rule function looks for if the rule is true, and if so checks if there is an existing notification using the GET API, and if there is updates it with the PUT API and if not creates a new one with the PUSH API. If the rule is false, it checks if there is an existing notification using the GET API, and if there is updates it (closes it) with the PUT API and if not doesn’t do anything.
The sample code also includes an example of how the additional_data portion of the notification payload can be used to auto populate a plot in the notification’s activity timeline. This is useful to automatically show a plot of the time series signal that demonstrates why the rule was triggered or more information that would likely be helpful once a user comes into the Renewable Suite alerted by the notification email.
Parameterization:
Your code likely utilizes some variables that would be useful to have exposed on the UI for any adjustments desired without having to edit within the code itself and re-upload the container. To expose parameters, you must name them “parameter1”, “parameter2” etc. as shown in the sample code’s handler function. While this enables confidentiality to be retained, if you want to note which parameter is which variable you can use the rule description notes section free text area to make a note. You can add as many parameters as you want, just make sure all are specified on the UI when you upload your rule.
Create a Docker Image
The Customer Containers feature utilizes Docker to package your code and dependencies to enable it to run across computing environments. If you haven’t used Docker before here is some documentation:
-
Downloading and installing Docker Desktop: https://docs.docker.com/get-docker/
-
Getting started with Docker: https://docs.docker.com/get-started/
Downloading and installing Docker Desktop: https://docs.docker.com/get-docker/
Getting started with Docker: https://docs.docker.com/get-started/
After writing your custom code, you need to create a Dockerfile and requirements.txt to containerize your code. An example requirements.txt is shown in the sample container provided and contains dependencies needed for the example_rule.py. This file should contain all the dependencies needed to run your rule.
Then, you can specify your Dockerfile. An example dockerfile is shown in the sample container provided. The major steps to specify here:
-
Start with an AWS Python base image. More information about the base image options offered by AWS can be found here: https://docs.aws.amazon.com/lambda/latest/dg/runtimes-images.html
-
Copy your requirements.txt into the Docker environment and pip install your dependencies. Once this is completed, remove requirements.txt from your Docker environment since it will not be used following this step.
-
Copy your current working directory to the Docker environment (here we name the directory /usr/ in the Docker environment).
-
Set the working directory in the Docker environment as the directory you copied over.
-
Set the entrypoint for your container to the name of the main function to run in your code. The sample code’s main function is called handler.
Start with an AWS Python base image. More information about the base image options offered by AWS can be found here: https://docs.aws.amazon.com/lambda/latest/dg/runtimes-images.html
Copy your requirements.txt into the Docker environment and pip install your dependencies. Once this is completed, remove requirements.txt from your Docker environment since it will not be used following this step.
Copy your current working directory to the Docker environment (here we name the directory /usr/ in the Docker environment).
Set the working directory in the Docker environment as the directory you copied over.
Set the entrypoint for your container to the name of the main function to run in your code. The sample code’s main function is called handler.
After creating your Dockerfile and requirements.txt, run the following two commands to create your Docker image and save it as a tar file to your local file system. Make sure you have downloaded Docker Desktop and have it running while executing the following commands.
Text
📘 Note
If you encounter the following error while building your Docker image, use the following command in place of the "docker build" command above.
Error
Text
Command
Text
Create your Notification Rule
Once you have your tar file containing your 1) dockerfile 2) requirements.txt and 3) rule.py file, you are ready to upload in a notification rule. In the Renewable Suite, navigate to the Notifications page and then click on the Rules tab where you can see rules already created and click on the button “Add Rule” to create a new rule.
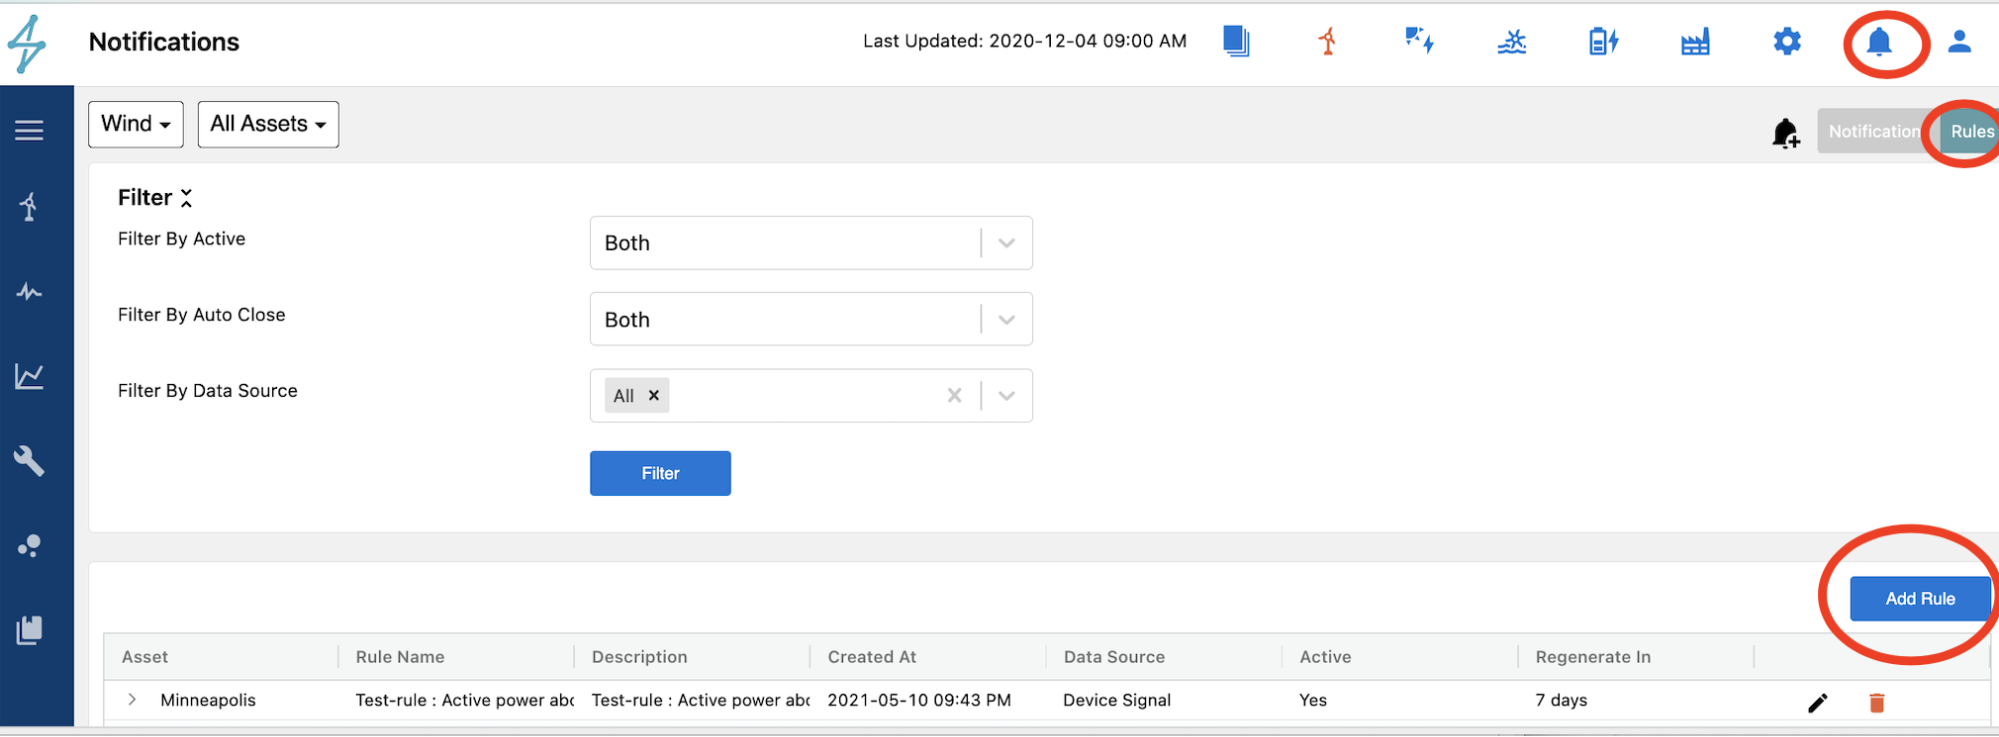
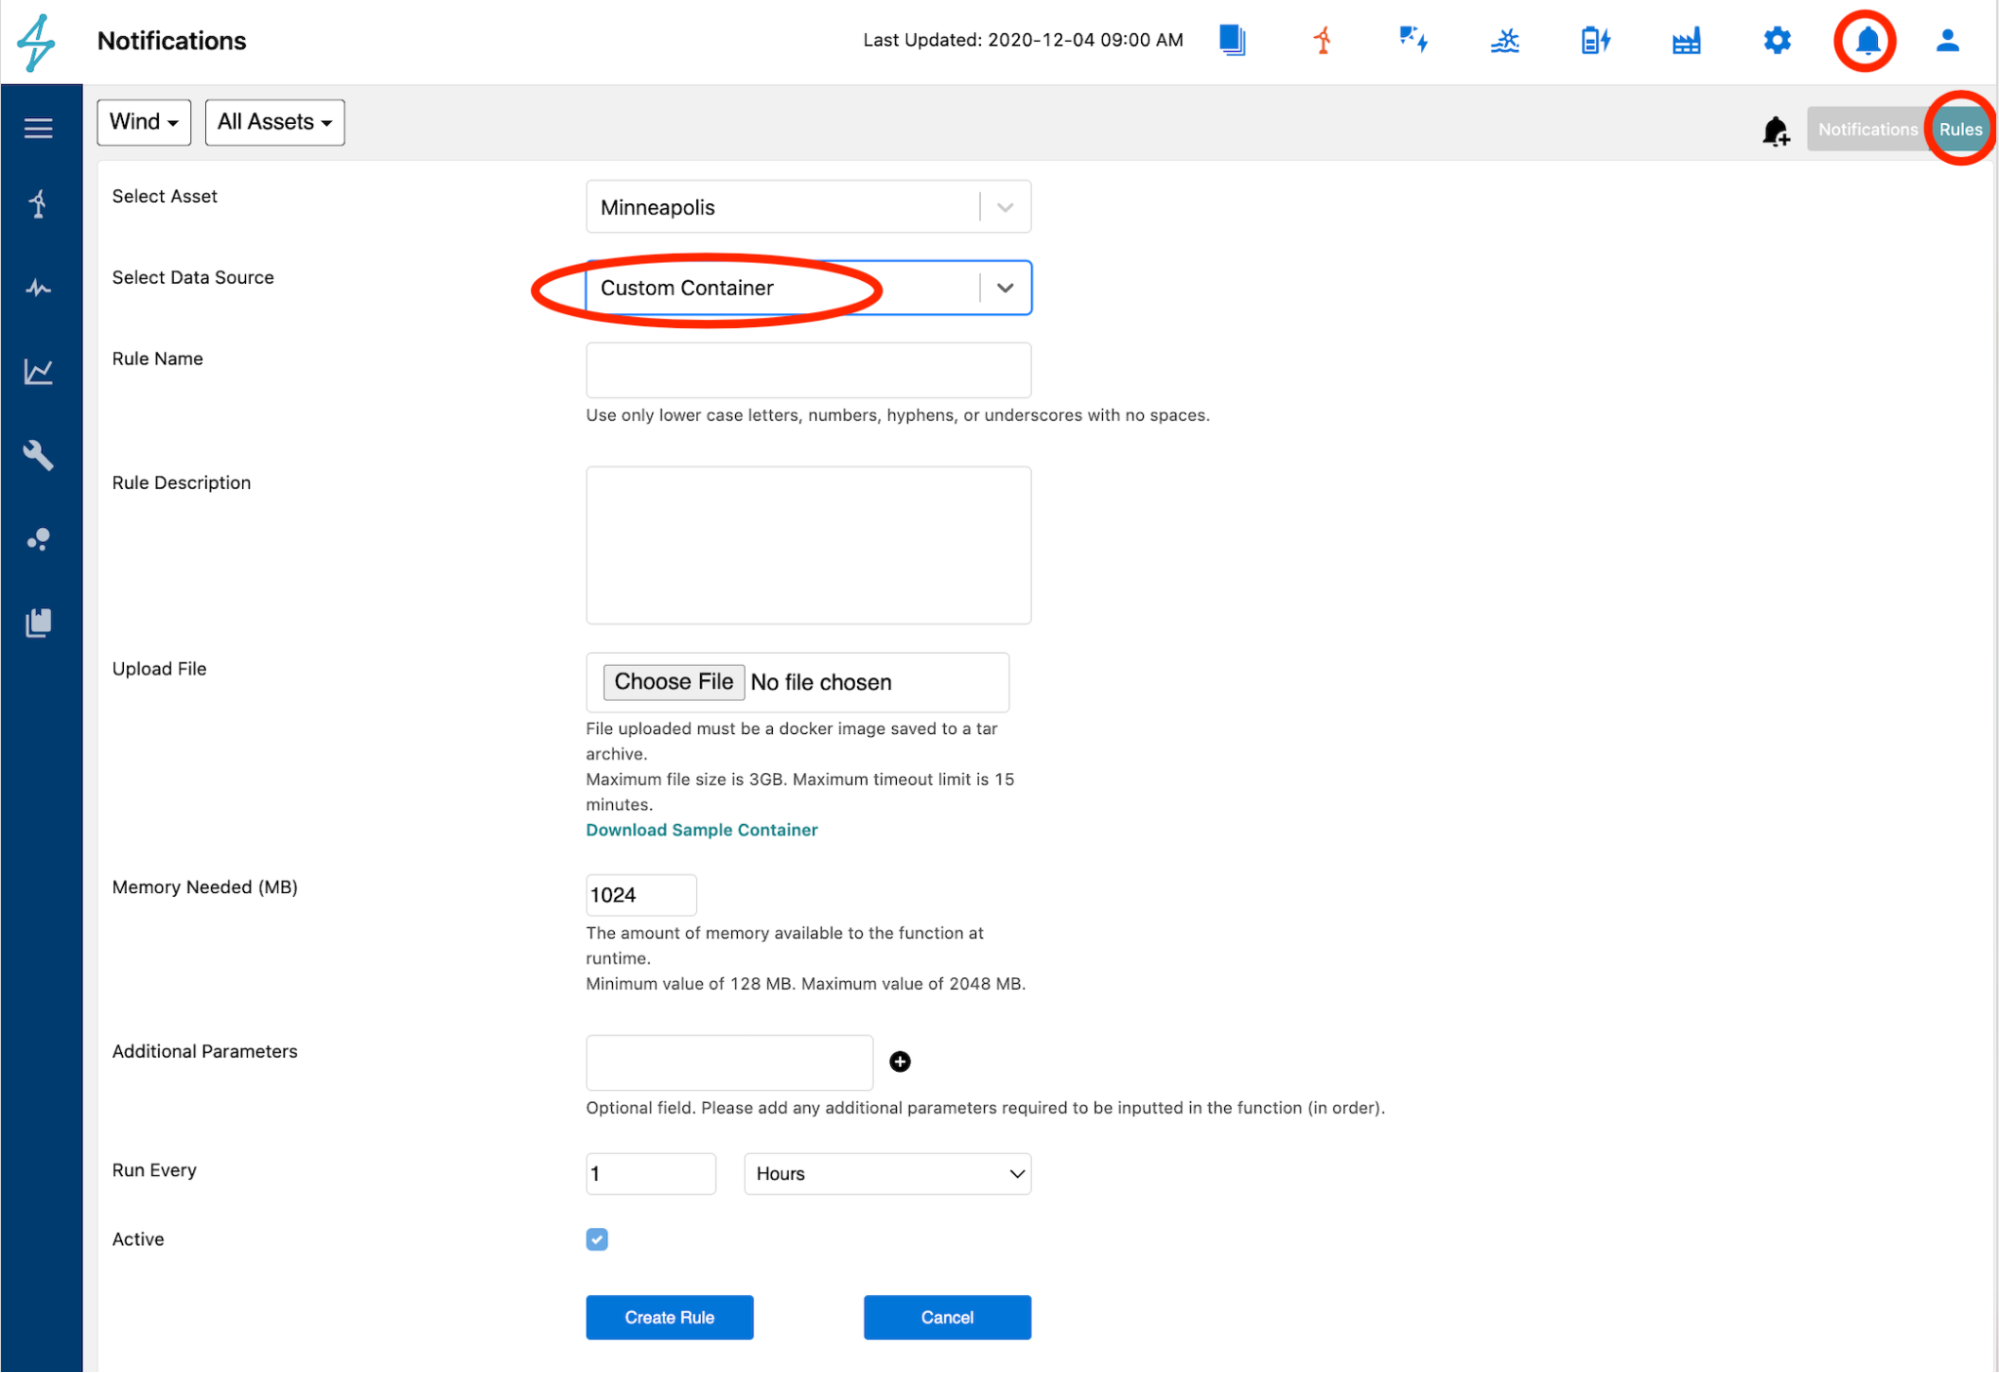
To create a rule using a Custom Container, select the asset of interest and then the data source as Custom Container. Custom Containers are a subscription and so if you do not see this option check the asset selected’s subscriptions in the Admin / Subscriptions page.
When creating a Custom Container rule you will:
-
Upload your tar file
-
Upload zip file of code (optional but helpful for storing code for future modifications)
-
Set memory requirements which will be the maximum amount of memory available to your container at runtime.
-
The maximum file size is 3GB and the maximum timeout limit is 15 minutes.
-
Specify Additional Parameters used by the code
-
Type the value of the parameter1 first and hit the + button. It will then appear editable for parameter1. You can add a second parameter by typing the value for parameter2 and hitting the + button.
-
Additional Parameters will be fed to the code as an event which is a JSON format document that the Lambda function handler can process.
-
Subscribed emails
-
Supply the API Key that includes all needed endpoints
-
Specify how often the rule should be run (limited to max once per hour). The rules will run on the hour. Once created, the container will first be triggered at the next hour.
Upload your tar file
Upload zip file of code (optional but helpful for storing code for future modifications)
Set memory requirements which will be the maximum amount of memory available to your container at runtime.
The maximum file size is 3GB and the maximum timeout limit is 15 minutes.
Specify Additional Parameters used by the code
Type the value of the parameter1 first and hit the + button. It will then appear editable for parameter1. You can add a second parameter by typing the value for parameter2 and hitting the + button.
Additional Parameters will be fed to the code as an event which is a JSON format document that the Lambda function handler can process.
Subscribed emails
Supply the API Key that includes all needed endpoints
Specify how often the rule should be run (limited to max once per hour). The rules will run on the hour. Once created, the container will first be triggered at the next hour.
Update Your Custom Container
You can edit your Customer Container rule on the UI changing any field or uploading a new tar file. Existing container files can be downloaded as shown below, this can be helpful in editing existing rules.
Downloading Existing Custom Containers
Existing Custom Containers can be downloaded by selecting Edit Rule in the Notifications module Rules tab.
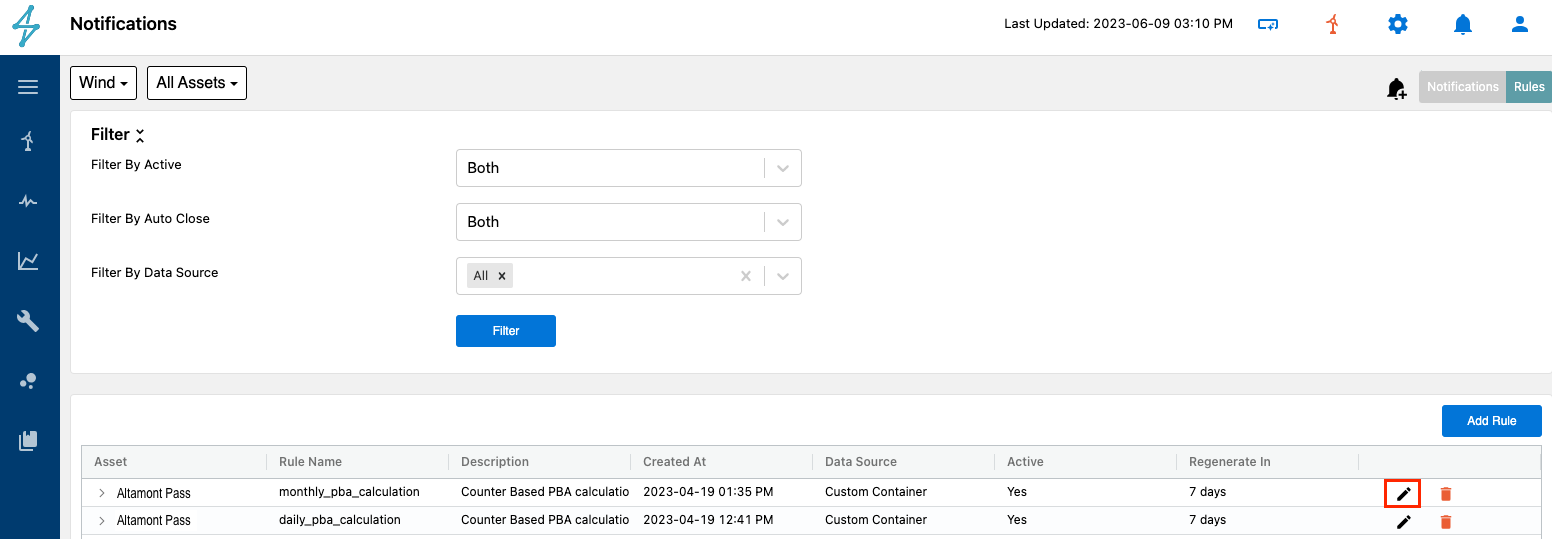
Once in the rule, next to the Upload File field users can click the Download arrow to download the existing custom container.
Existing containers can be downloaded as a .tar file or .zip file if the .zip was uploaded for reference. Having the .zip available as an attachment keeps the code in a central repository to allow for ease of editing the rule.
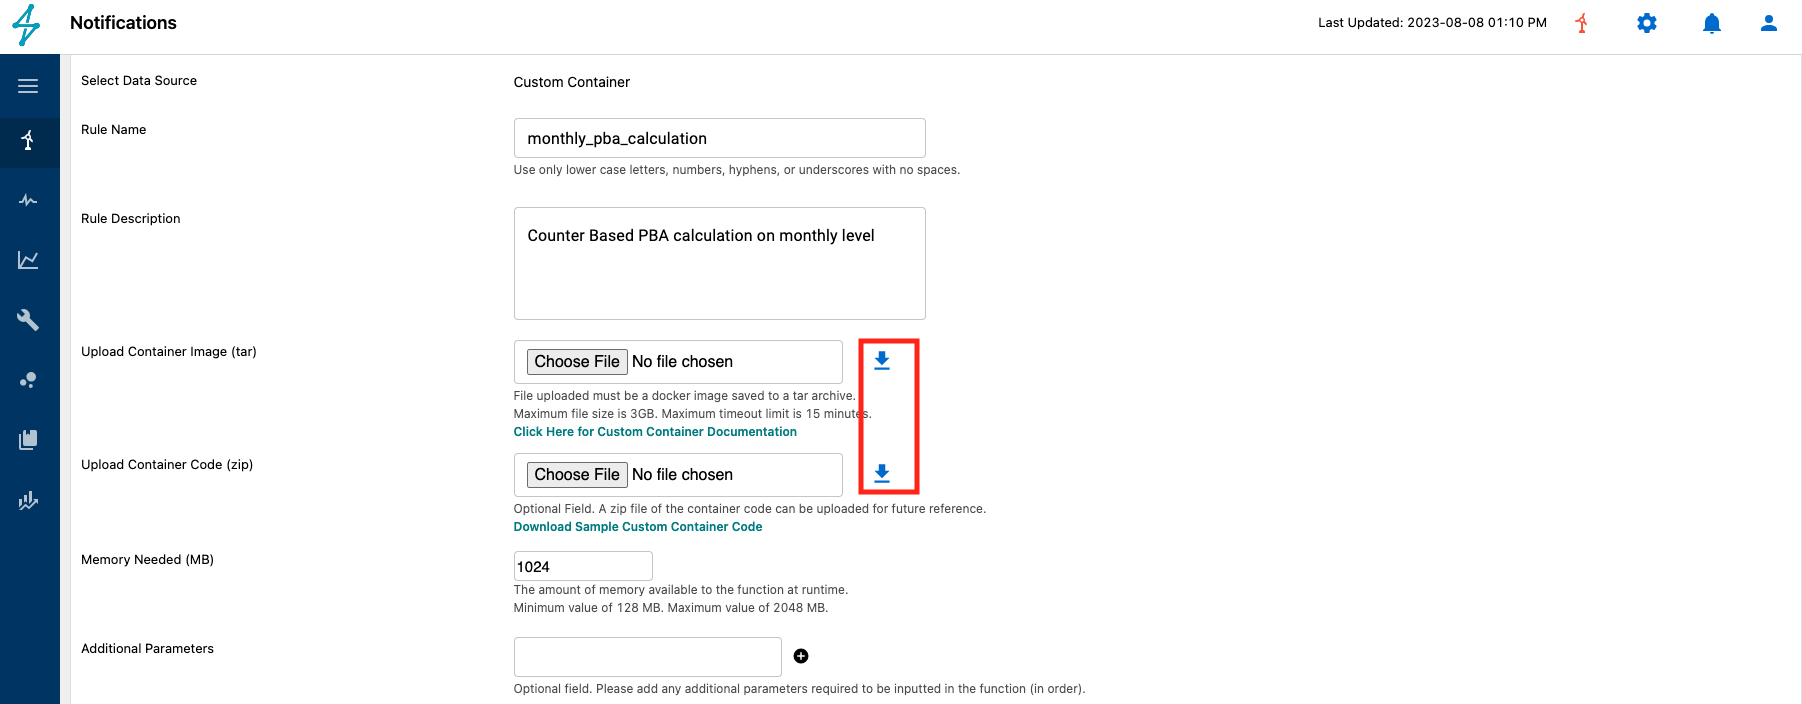
📘 Upload File: No File Chosen
Even though the Upload File field shows No File Chosen, if the rule has a file for download the Download Existing Custom Container button will appear.
