Table of contents Components Updated over a week ago Table of contents
The Component Module is intended to keep track of your inventory of components and associated tickets around instances of components that need intervention. This can be useful to manage workflows and collaboration to tack component replacement or other long-term major component interventions like repairs or inspections.
Application
This module was designed for a reliability engineer, plant manager, or operations executive that is looking to answer some of the following questions:
-
what are the details around this particular failure? when was it noticed, what was done to look into it, how long did it take to repair? what component part number failed and what was it replaced with?
-
how many of a particular component from a particular OEM exist installed at this asset and what is the distribution of their failures and longevity?
-
what is the distribution of manufacturers I have installed across my fleet for a specific component and how does their mean time to failure compare to each other?
what are the details around this particular failure? when was it noticed, what was done to look into it, how long did it take to repair? what component part number failed and what was it replaced with?
how many of a particular component from a particular OEM exist installed at this asset and what is the distribution of their failures and longevity?
what is the distribution of manufacturers I have installed across my fleet for a specific component and how does their mean time to failure compare to each other?
Before the statistics can be run on this data, information about the inventory throughout the fleet across all levels of component hierarchy must be documented in a structured fashion and a workflow to record information about components such as repairs and replacements must be documented by users across various roles in the company in a way that can be mined for data. The Component Module aims to do just that.
Setup Configurations
This module is extensible to allow customized hierarchy, component attributes, and ticket attributes on a per-asset basis. Customers can choose to implement consistency across their fleet in these configurations or implement fields that are asset specific. All these configurations can be found on the Configurations tab of the Components Module.

Hierarchy Configurations
The Component's module reference the component hierarchy in both the inventory and ticket pages. Therefore this configuration must be set up first to be referenced and also has the ability to be added to or edited as needed.
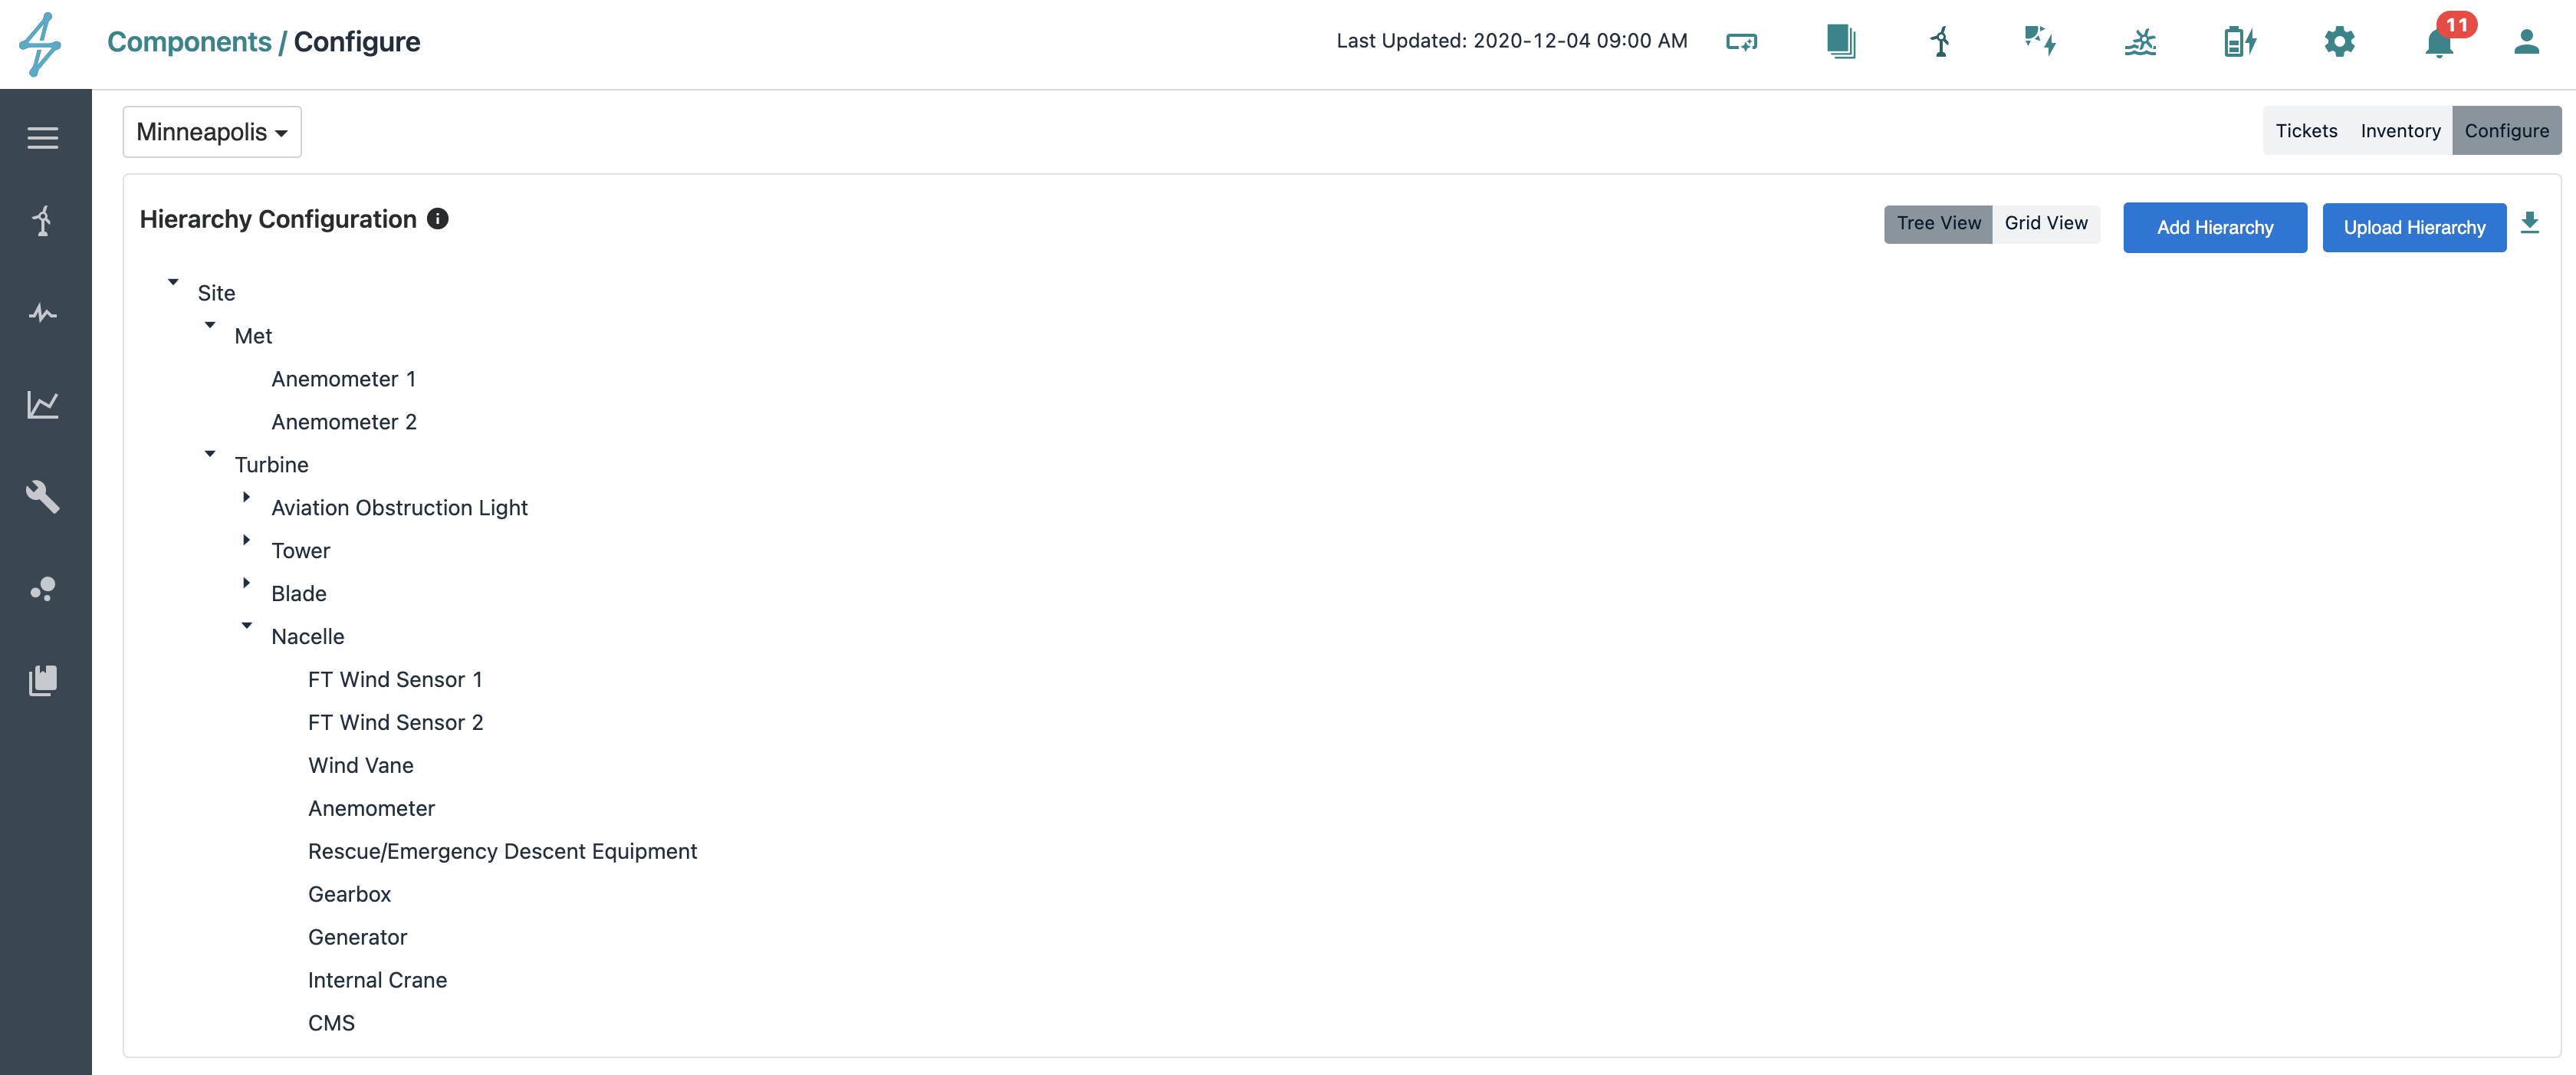
Hierarchy Tree View on Components Configuration Page. When setting up this page for a new asset, this will look blank.
You can add the component hierarchy by uploaded a CSV (sample provided) or added on the UI.
To upload a file, use the Upload Hierarchy button which will allow you to select a file. You can use the sample file provided or you can download the existing hierarchy if you want to make updates from the existing version. Both are csv formatted files with the proper header format required. There is a validation step that allows you to see the fields uploaded. If there is an existing inventory created for a hierarchy field changed, it will create a new field and not delete the existing referenced one.
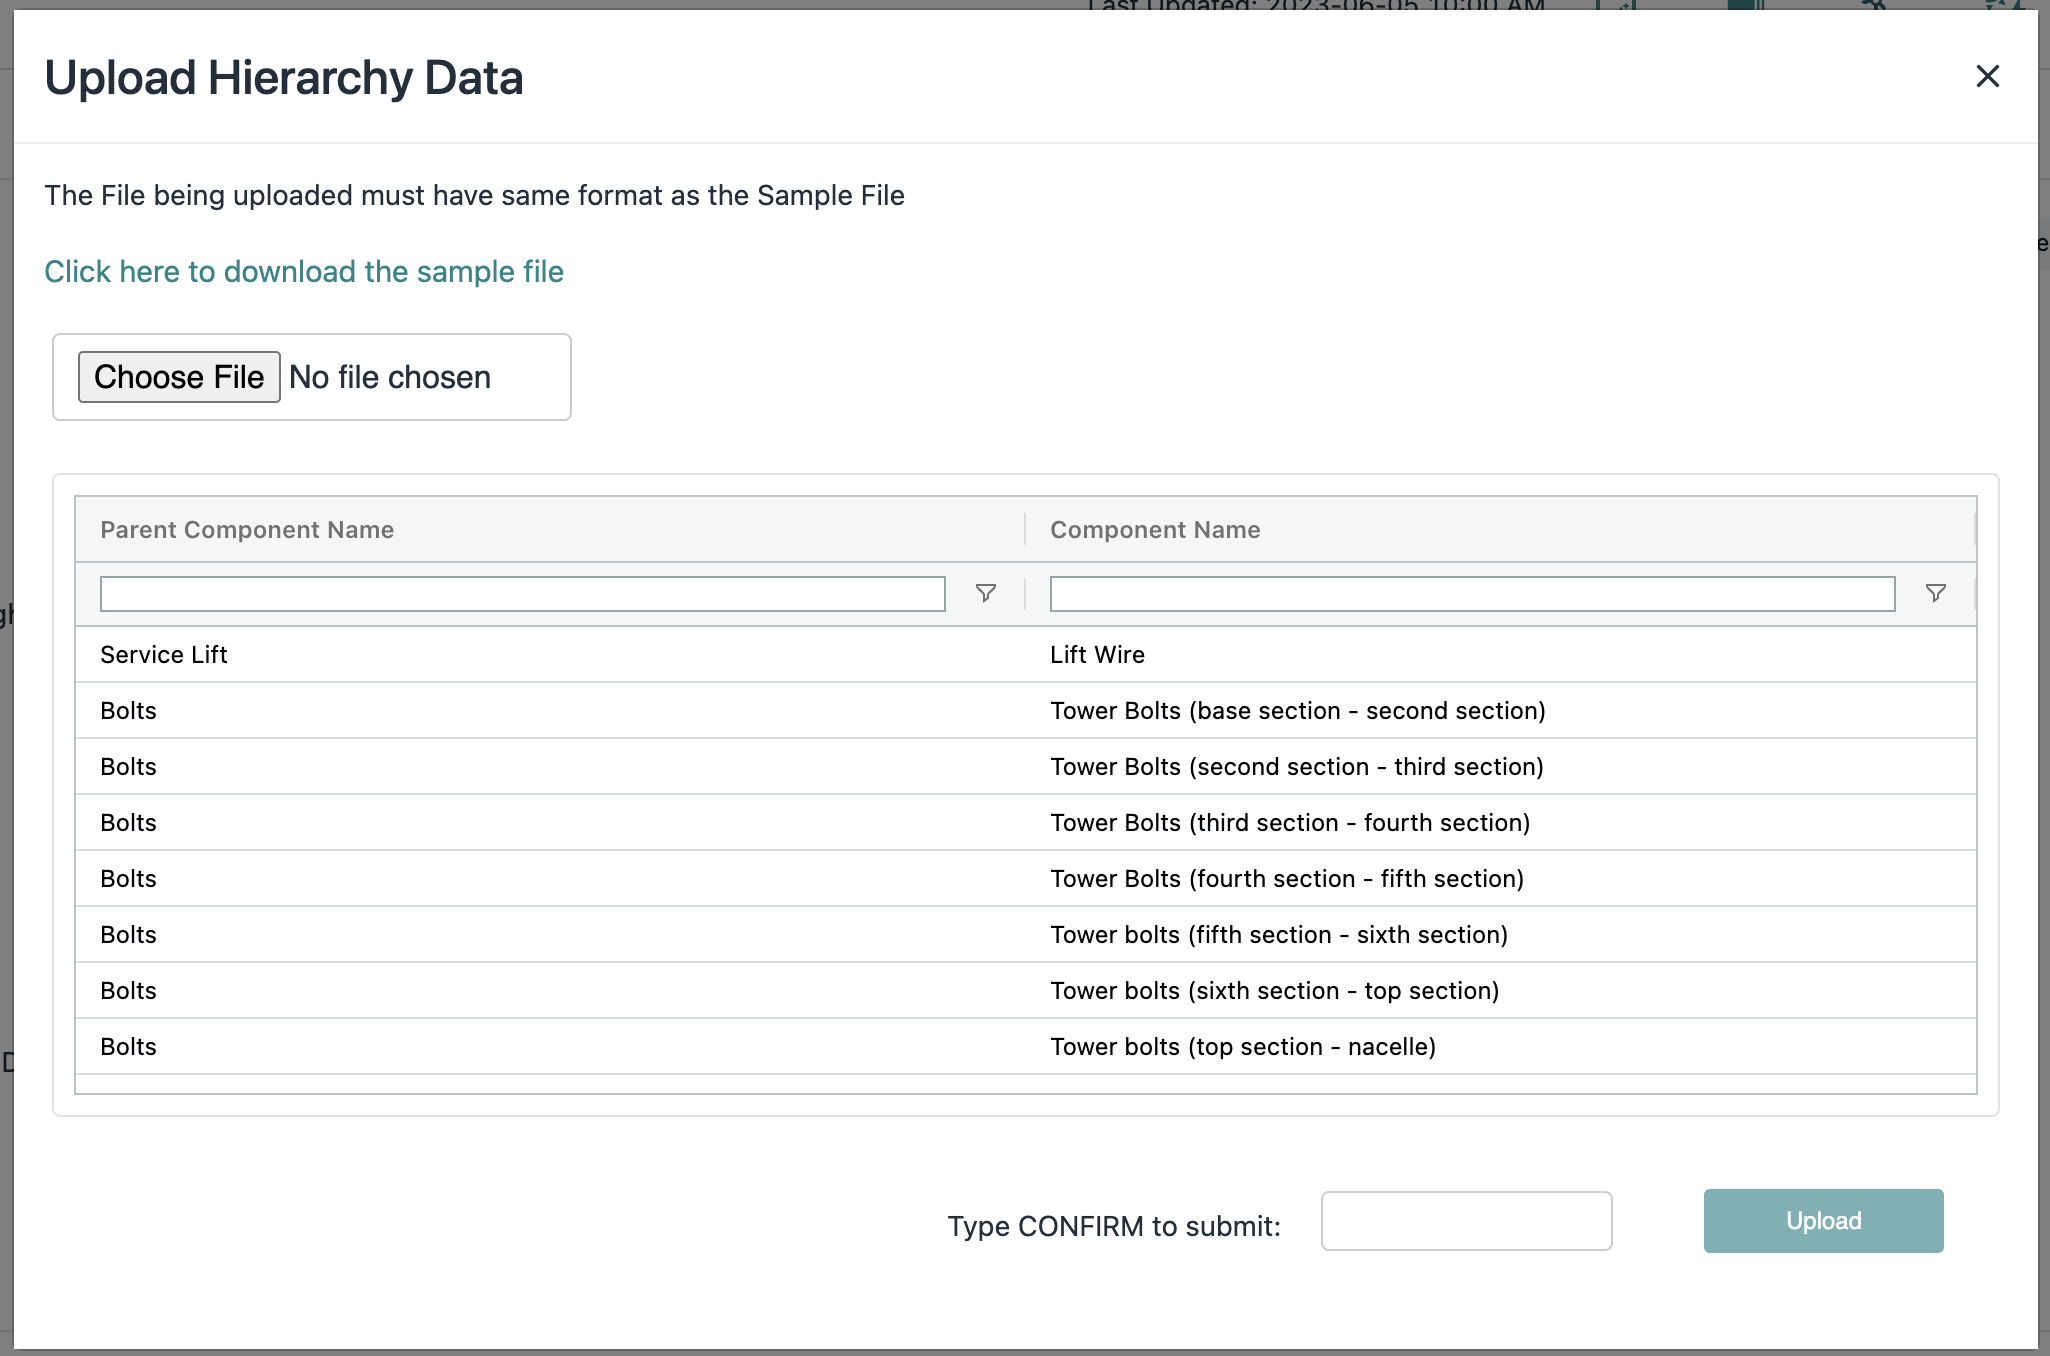
Example of validation completed when uploading a new hierarchy file
You can also add new hierarchies one-off with the Add Hierarchy button which asks for the component name and the parent component it should reside under.
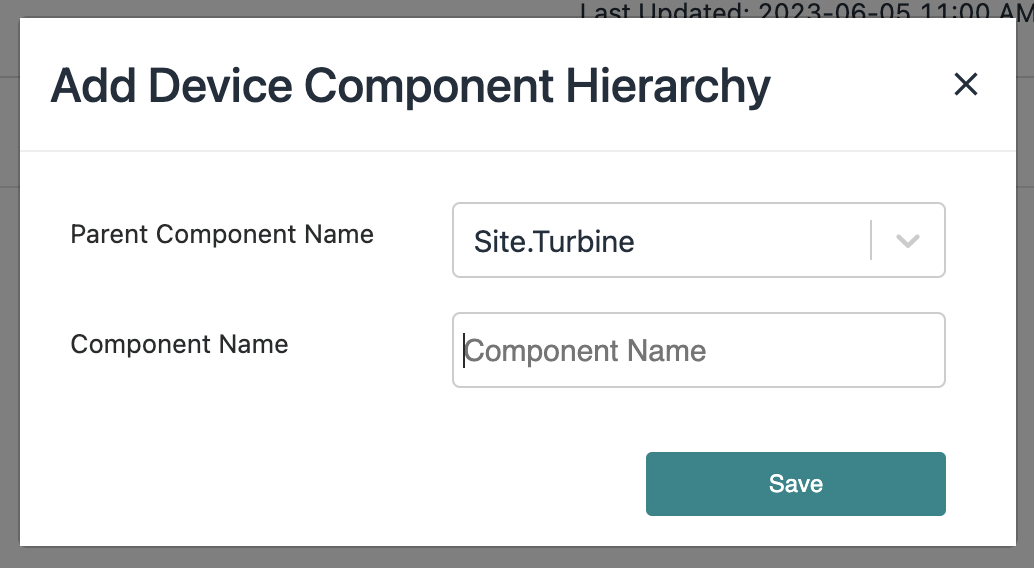
Example of adding a component hierarchy under the Turbine parent component
Component Attributes
Up to 10 component attributes can be added to the definition of a component in the inventory record. These can be configured uniquely per asset. A user can create a display name and turn these attributes on or off. Note that if you populate information under that attribute field in the inventory list, changing the name may lead to confusion of mislabeled information. Additionally, if you hide the display, the data will not be deleted only visually removed from the tables. Therefore it is helpful to configure these attributes when setting up the information useful for storing and being careful with updates.
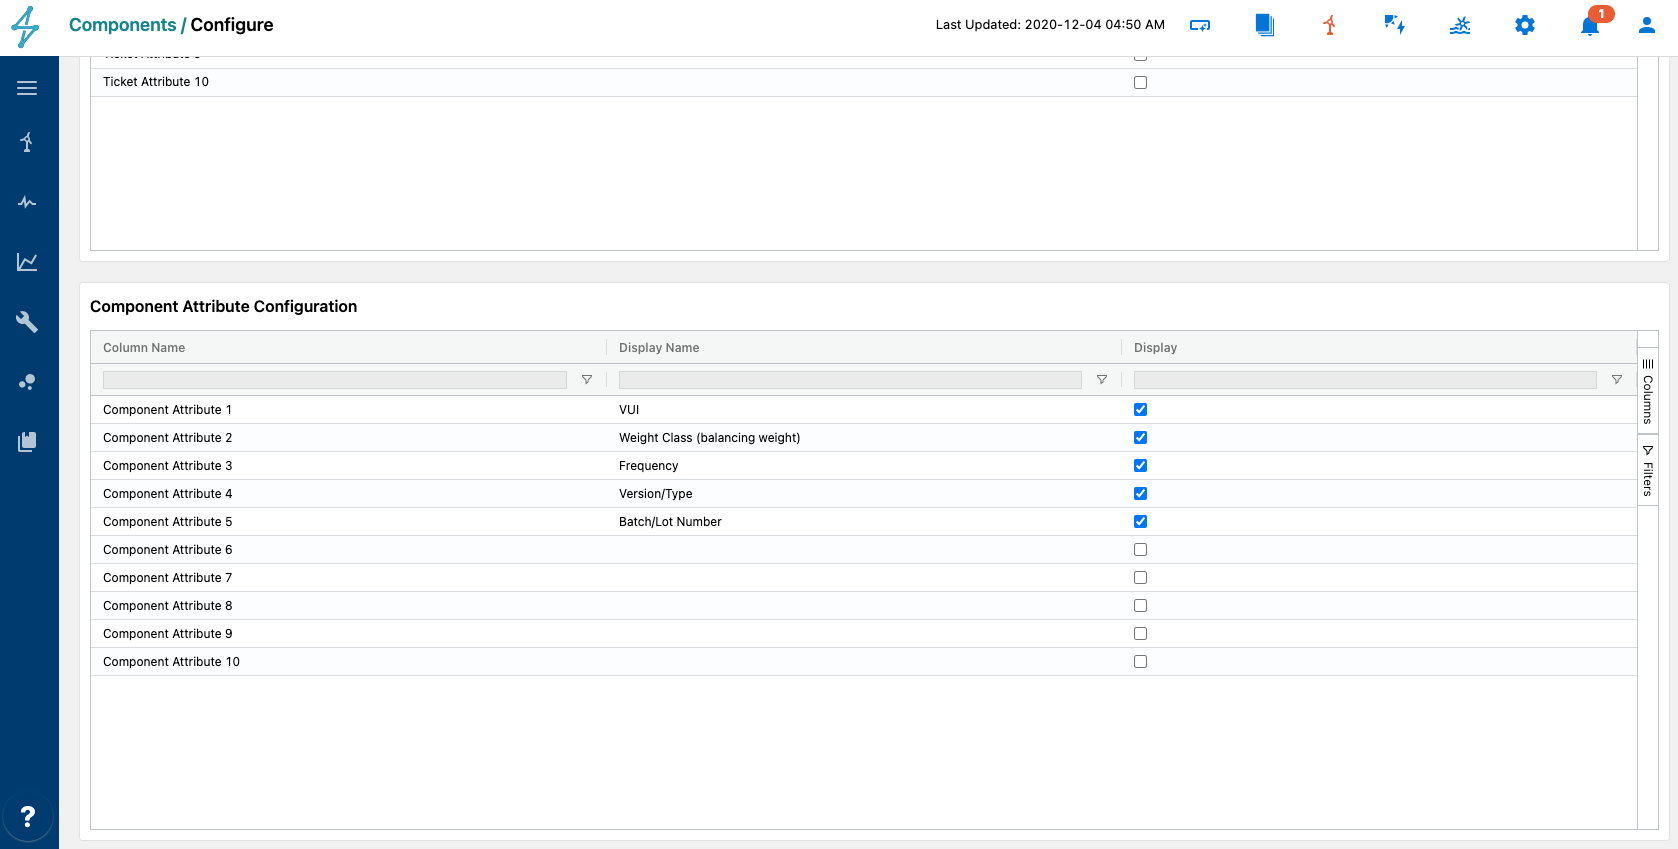
Example of component attribute features added to a Vestas wind site - e.g. Vestas unit number (VUI).
Ticket Attributes
Up to 10 ticket attributes can be added to the definition of a component ticket. These can be configured uniquely per asset. A user can create a display name and turn these attributes on or off. Note that if you populate information under that attribute field in a ticket, changing the name may lead to confusion of mislabeled information. Additionally, if you hide the display, the data will not be deleted only visually removed from the tables. Therefore it is helpful to configure these attributes when setting up the information useful to storing and being careful with updates.
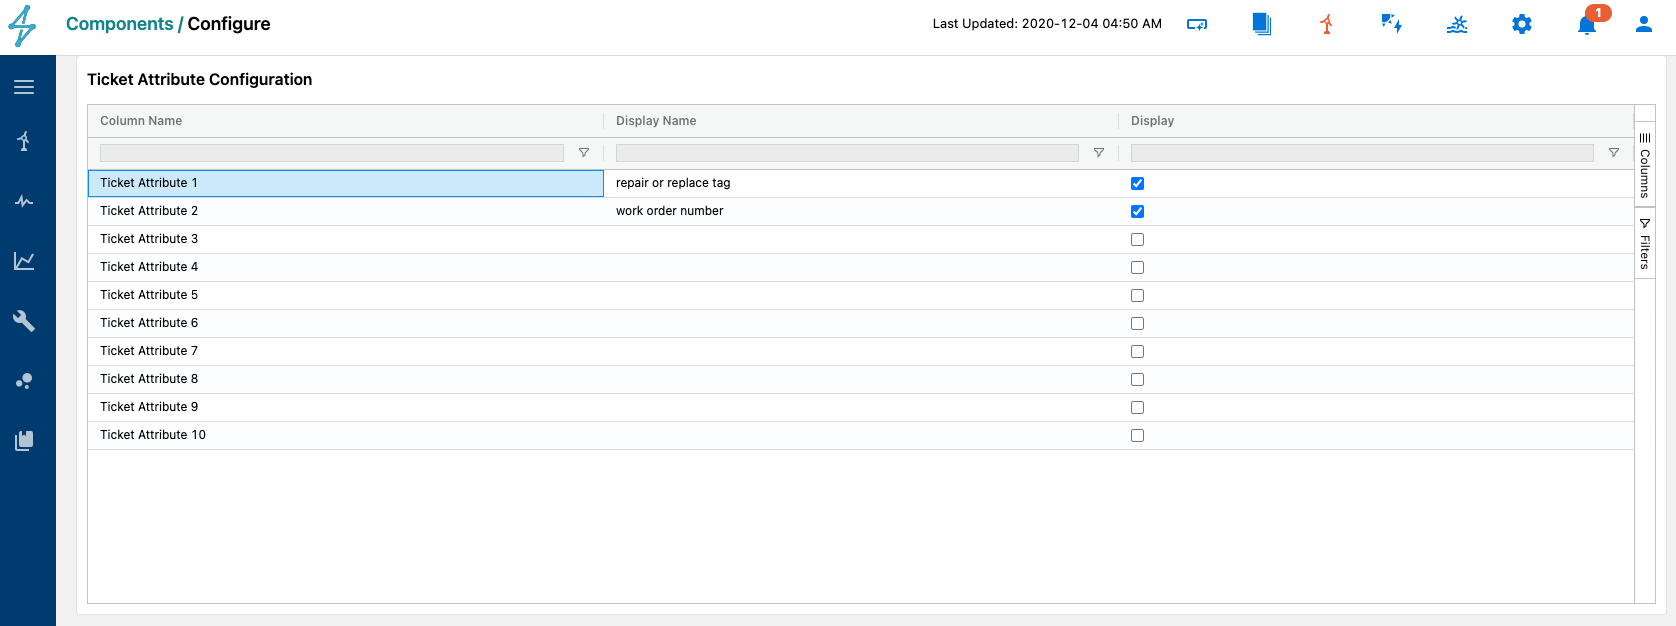
example of ticket attributes - e.g. wanting to label a ticket as repair or replace so that those keywords could be referenced later; or wanting to list the corresponding work order number that could be correlated with a work order management system if needed.
Inventory Management
Wind, solar and storage projects alike have component lists provided upon project completion that list all part numbers and other useful information about what specific components are installed throughout the site. This data can be structured to be uploaded into the Renewable Suite so that changes can be managed and the list of existing components can be referenced for analytics. The uploading and maintenance of the inventory is designed to be self-service for users with appropriate permissions to be able to bulk upload and add throughout standard workflows.
Inventory can be added as you are inputting tickets for major component incidents, but it is best practice to upload the initial inventory upfront so that normally operating pieces are recorded as well for reference and use in analysis.
You can view and manage inventory on the Inventory tab of the Components module. There are three ways to upload/update the inventory 1) through bulk upload of a csv (Upload Hierarchy button) 2) one at a time with Add Hierarchy button and 3) via a Ticket. When you upload from a csv you can start by either the sample file in the popup provided when you select upload hierarchy or by downloading the table of the existing hierarchy with the download arrow button or right-clicking on the table itself.

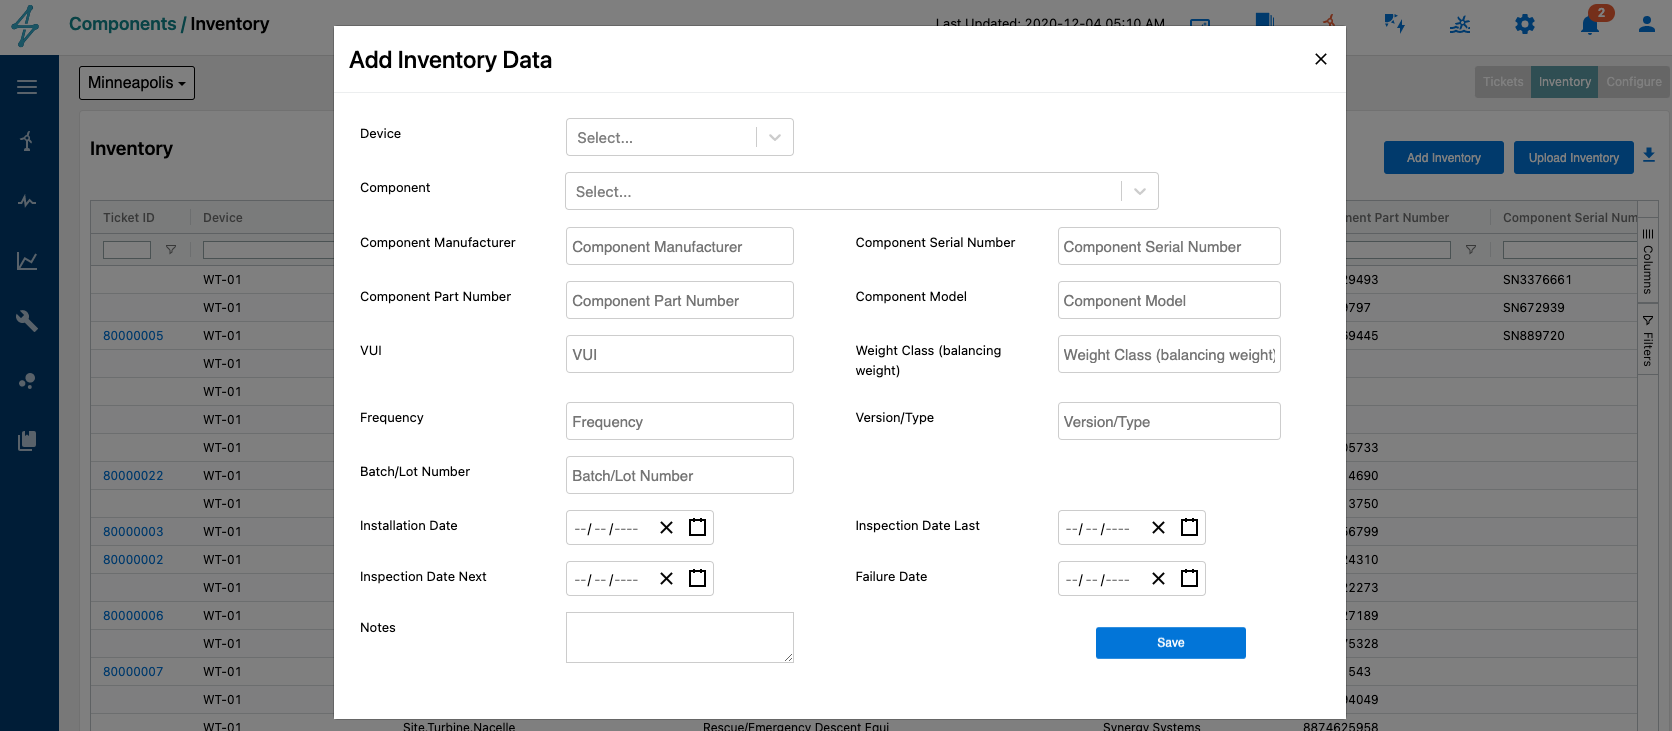
When you add a hierarchy, you will be prompted to enter the device and component prior to entering the relevant information fields, including the component attributes configured. An inventory entry is unique to that device and that component; if you attempt to add an entry for an instance of a component that has already been entered, the form will auto-populate with the fields already available. If you make a change and hit save, it will update that inventory entry and save a history log that the update was made by you.
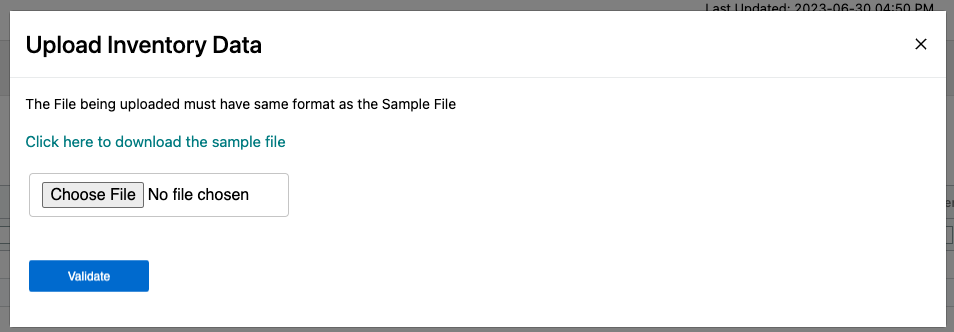
Inventory data can be bulk uploaded as well by selecting Upload Inventory, this brings up the Upload Inventory Data window where users can select a file to bulk edit or upload inventory. If uncertain of the file format a sample file can be downloaded for a starting point.
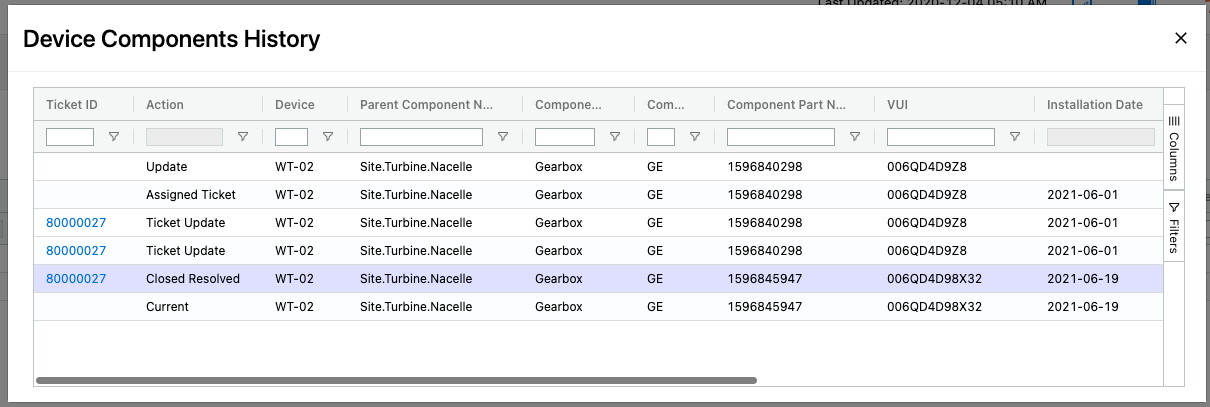
To view the history of how the entry for a device's instance of a component, right-click on that entry. The table that appears will note any update to a field. These updates could have been made by editing an inventory directly or through a ticket. If the change was made through a ticketing workflow, the ticket ID will be linked.
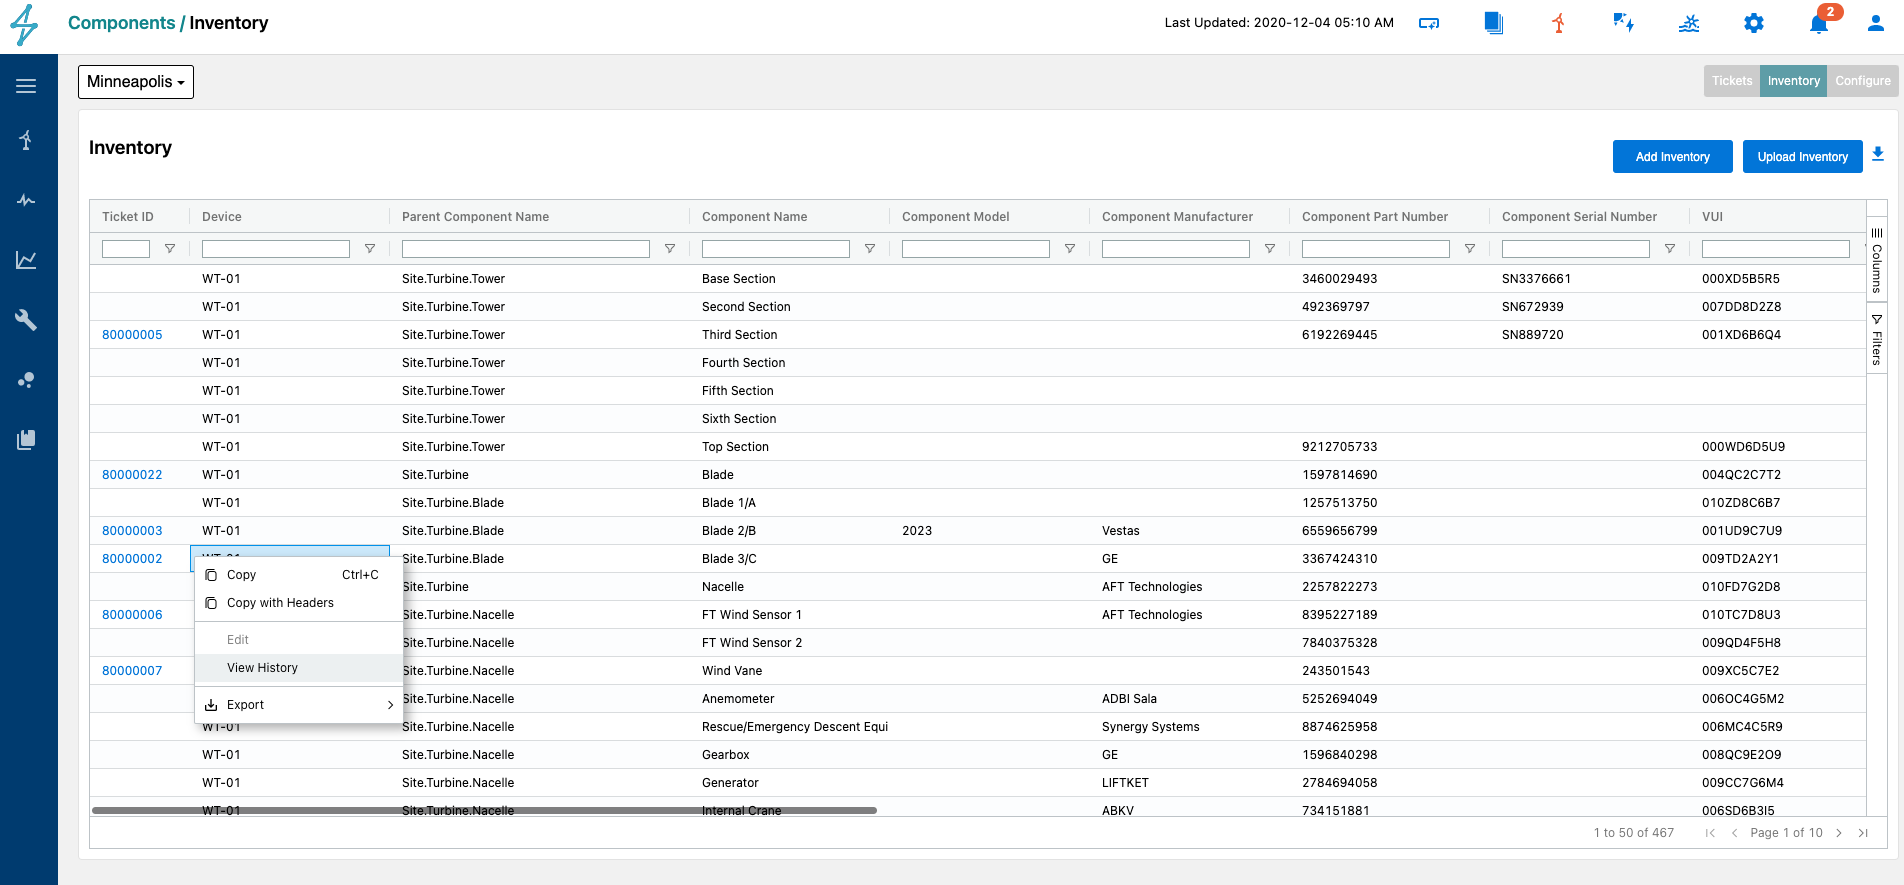
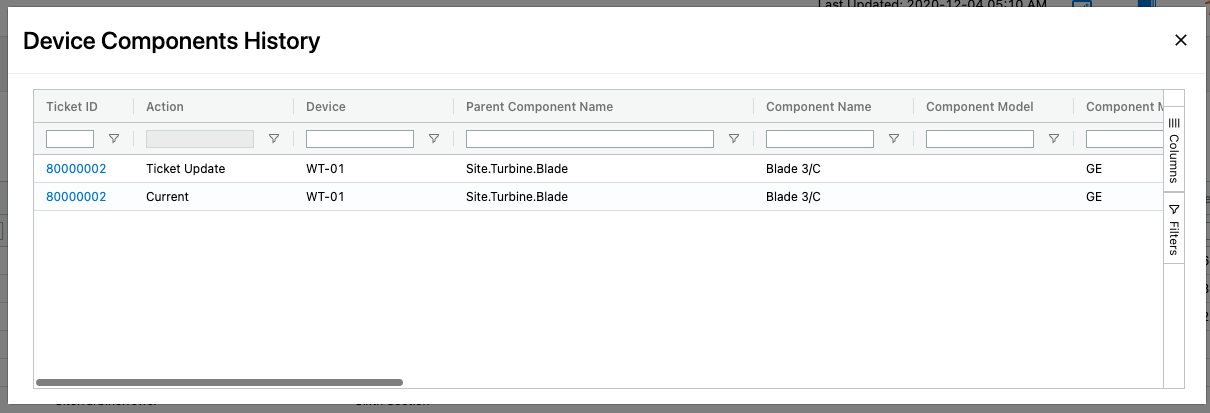
The history table includes fields for who updated it and when so that there is a complete log of what changed and by who. If a part is replaced, you would be able to see the prior part in this history log too.
👍Suggested tip: If you are updating a typo or adding component details, updating an inventory directly in the inventory page is simple. If you are updating a component due to a part replacement, it is best to do so through a ticket workflow to have full flexibility to track details.
Ticket Workflow
Tickets can be opened in relation to a device and a component. When you navigate to the ticket page, you can see all tickets that have existed in the time range filter.

Tickets are designed to only have one ticket open at a time for that device and that component. If you attempt to enter a second ticket about one that already exists, it will provide you with a warning. This is intended so that all issues associated with an instance of a component at a point in time are in a single place. If an issue is no longer relevant, that ticket's status should be moved to "closed" and then you can open a new ticket about that component for that device. This also allows linked records to inventory to have a single ticket associated with a replaced part.

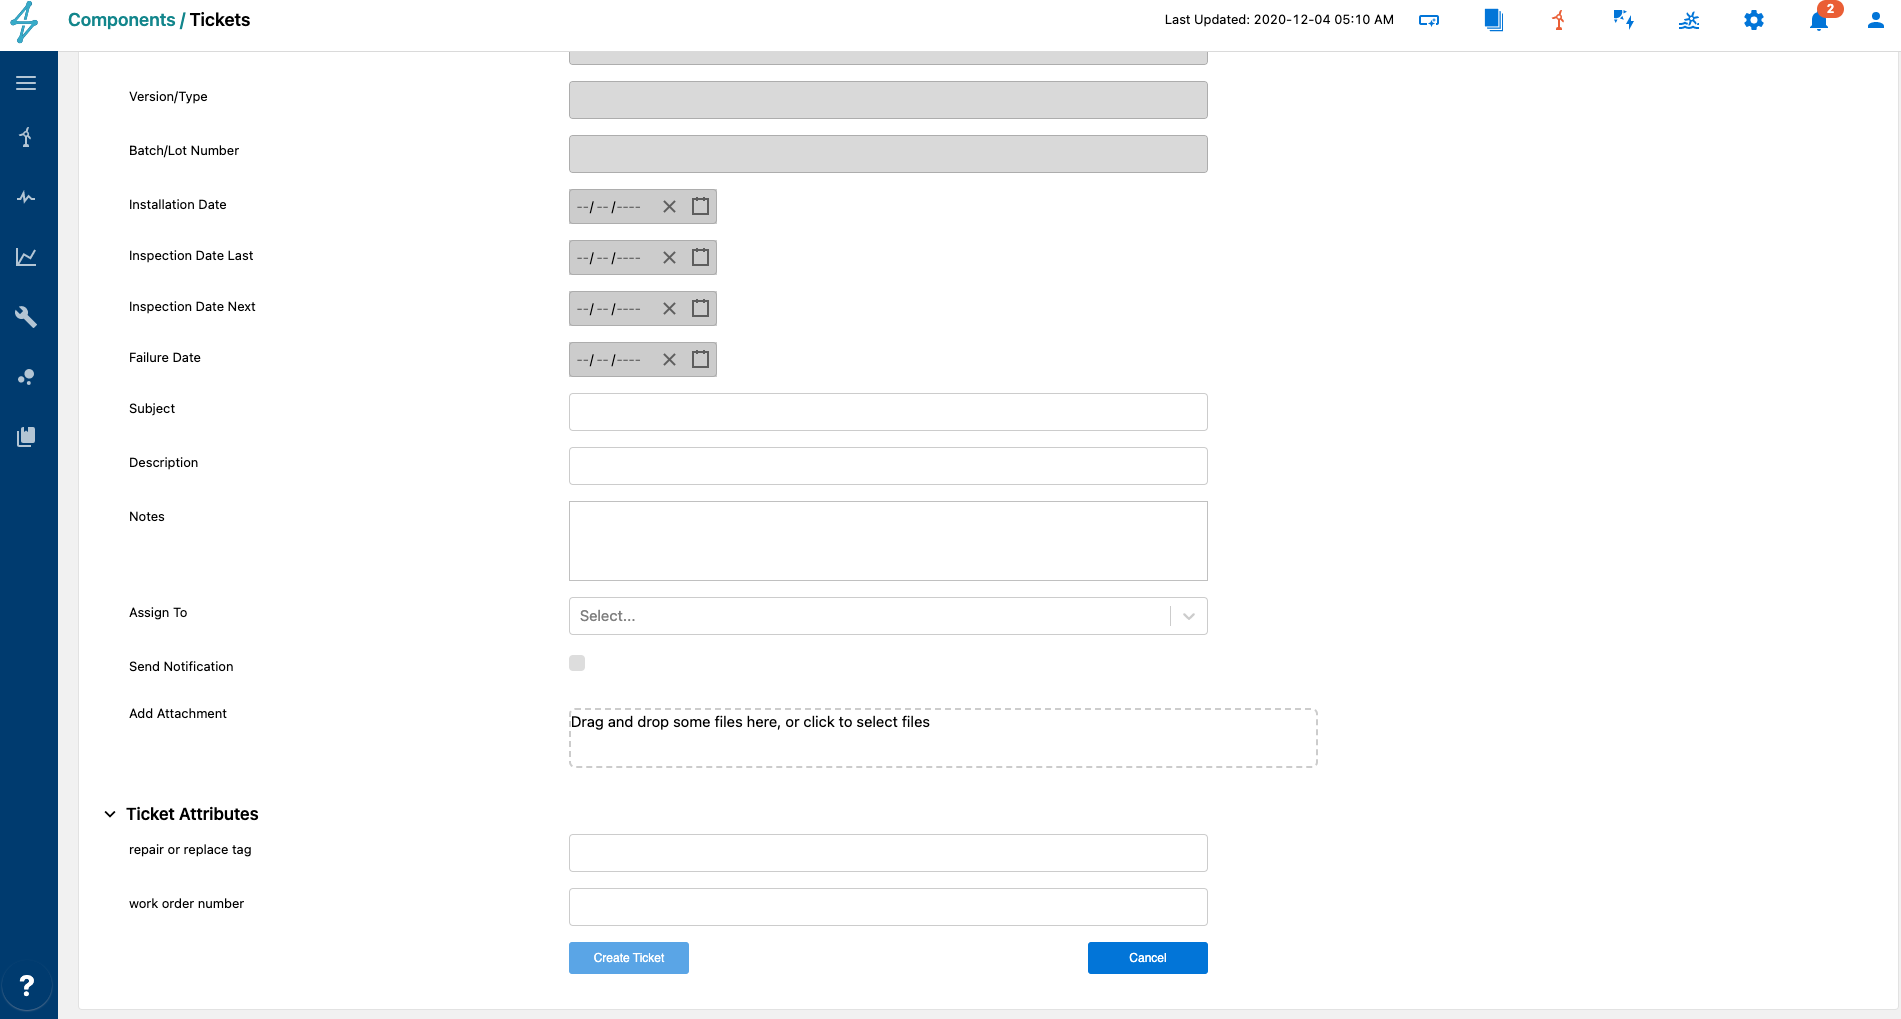
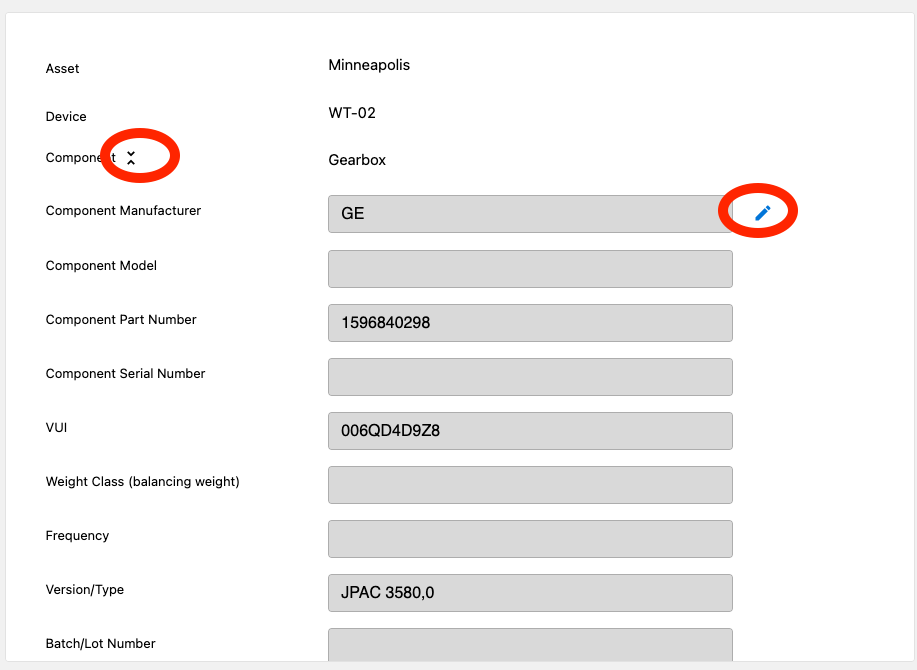
When you open a new ticket, you first assign it under a device and component. The component must exist in the hierarchy. If you intend to open a ticket you do not have listed, configure that hierarchy first. You can search for the component name or parent name in the drop-down field for the component. The list featured defaults to that which has a defined inventory for the device you selected. For example, if you have selected a met station device, you will see components associated with a met station and visa versa for a turbine or an inverter. Once you select a device and component, the component information from the inventory will auto-populate. The component-related fields will be seen in grey to differentiate editing those fields compared to ticket fields. You can still edit the component details by clicking the edit pencil button. If you edit those fields, you can save those separately by hitting the save button that appears with the pencil or with the ticket creation.
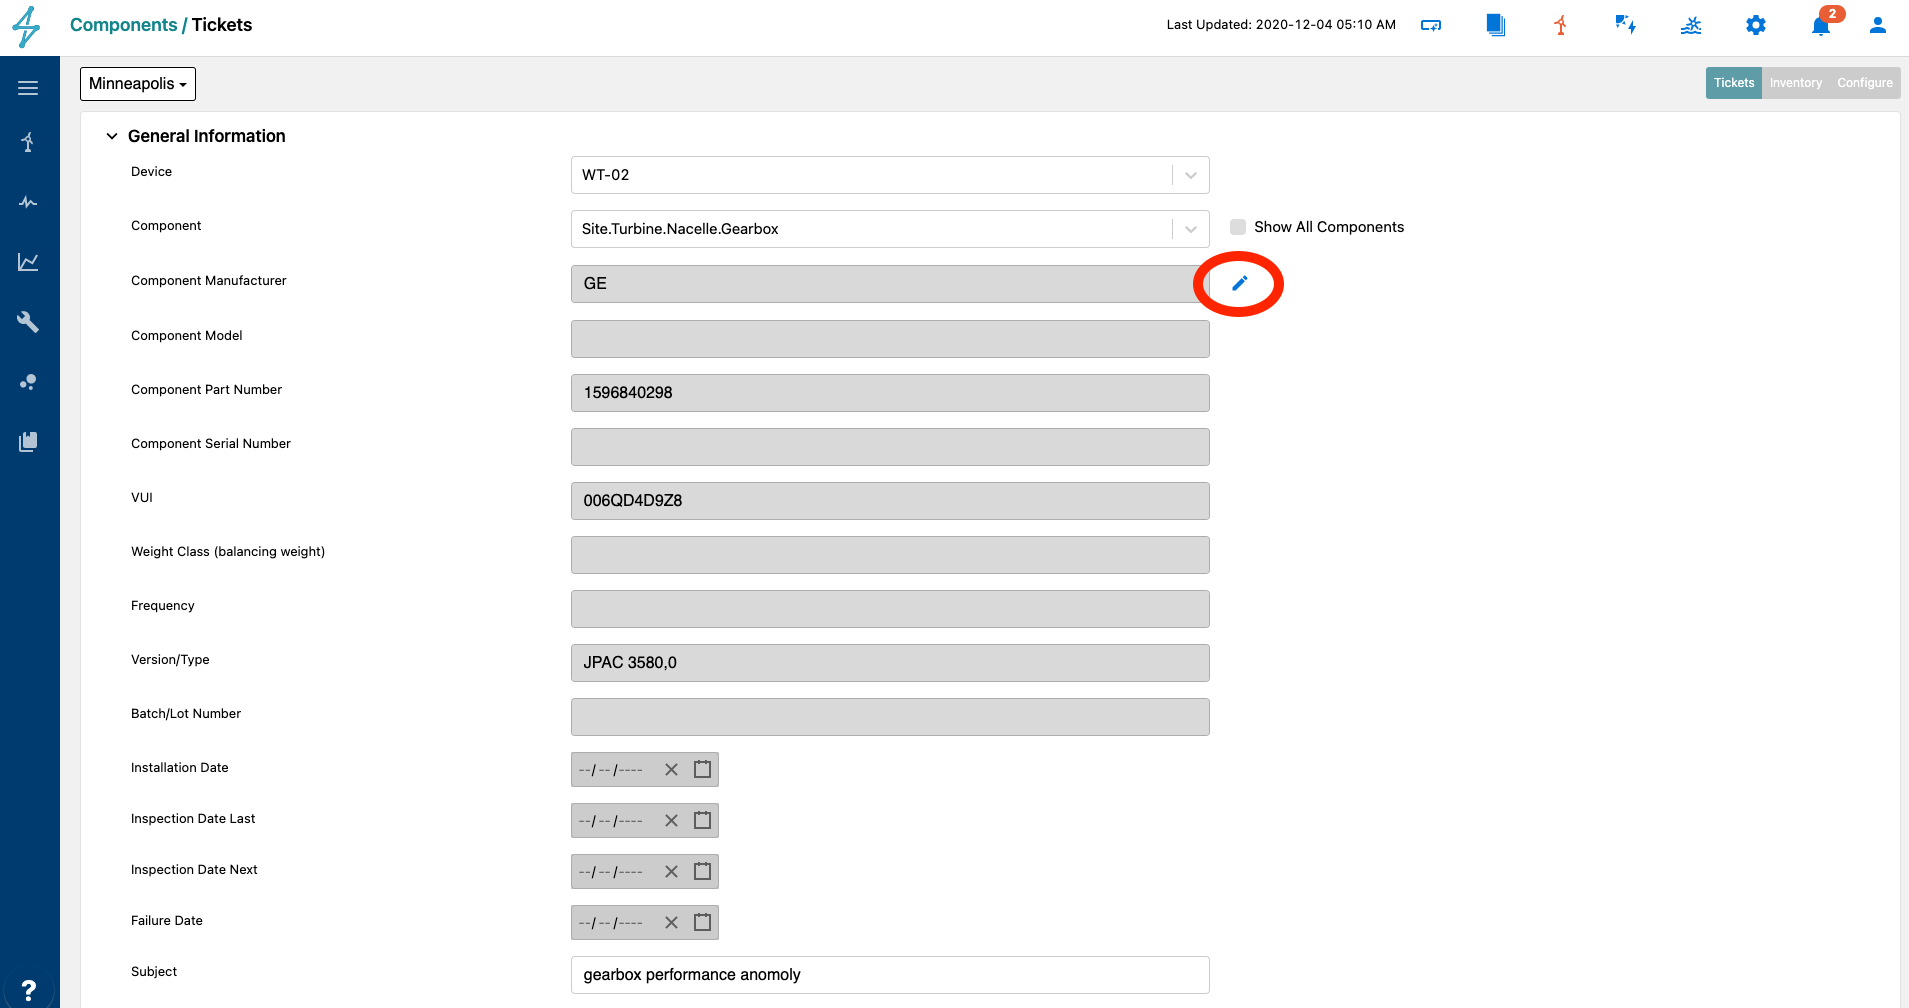
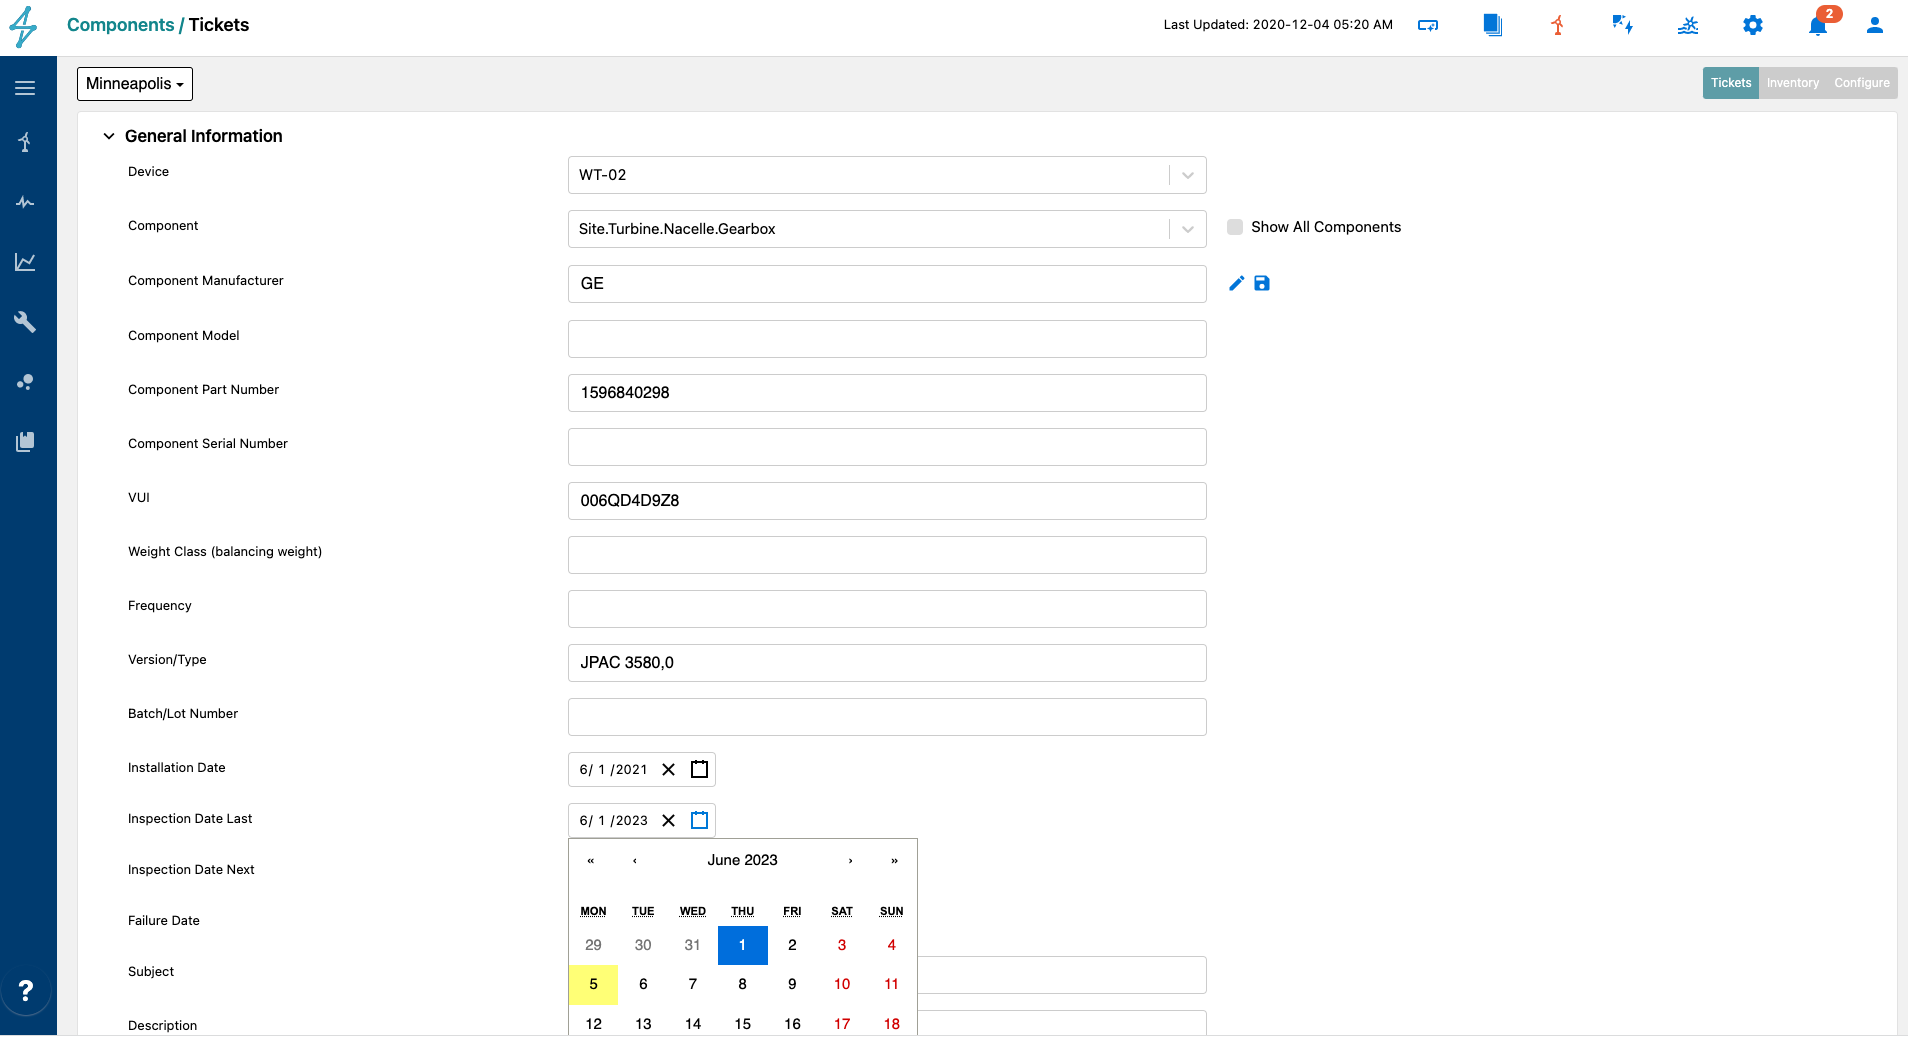
This example above is adding a ticket related to the gearbox and the user realized the inventory entry was missing the installed date and the last inspection date. The user added these to the inventory record when creating the ticket.
If you are looking for a component in the hierarchy that does not have an inventory entry yet, check the "see all components" checkbox and that will allow you to search beyond what is defined in the inventory so far. You can see below that the fields are blank given the inventory entry doesn't exist yet. The user can still edit the entry to add details to it the same way they did above when the entry was already populated with some information.
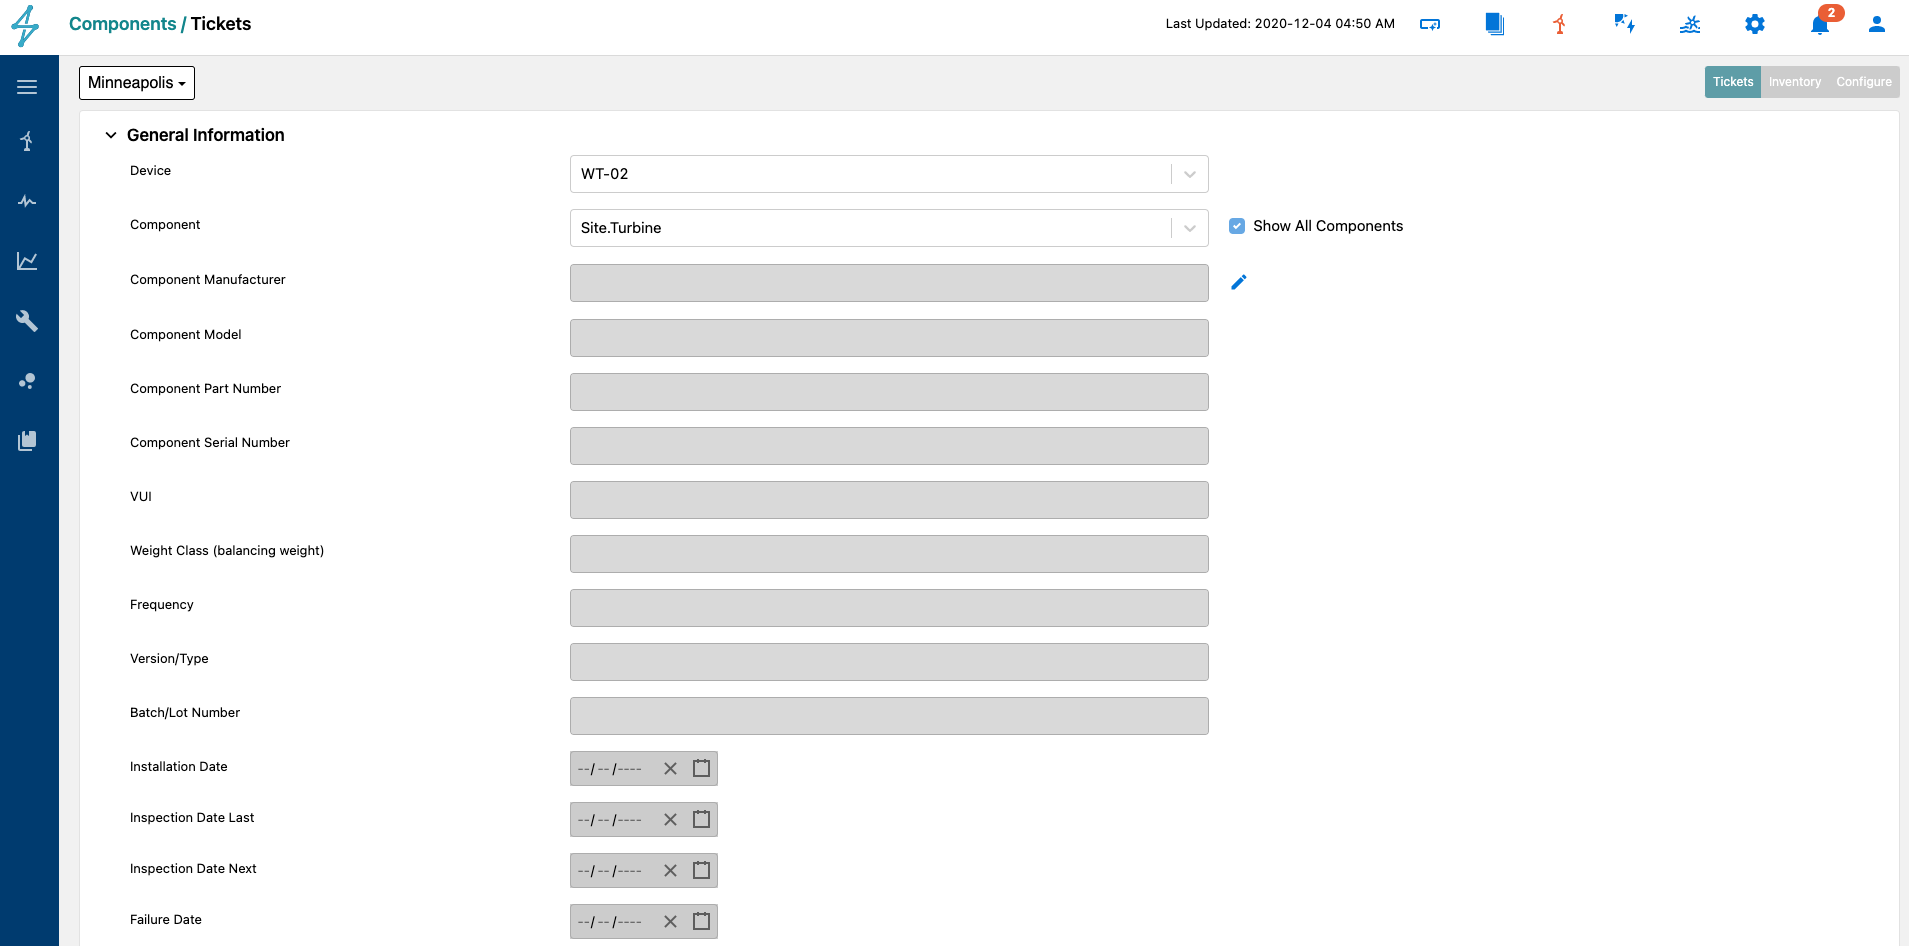
In addition to the component information related to the ticket, you can add a subject and description, add other attribute fields configured, add attachments, and assign a ticket to someone or send a notification to an email or sms to a phone number.
Once a ticket is created, users can interact with that ticket by continuing to edit fields, change statuses, update notes, add attachments, and assign to other users. All updates are logged in the notes field. The user can also see other relevant tickets in the neighboring tab which filters for tickets from the same device and component in case past tickets are convenient to reference.
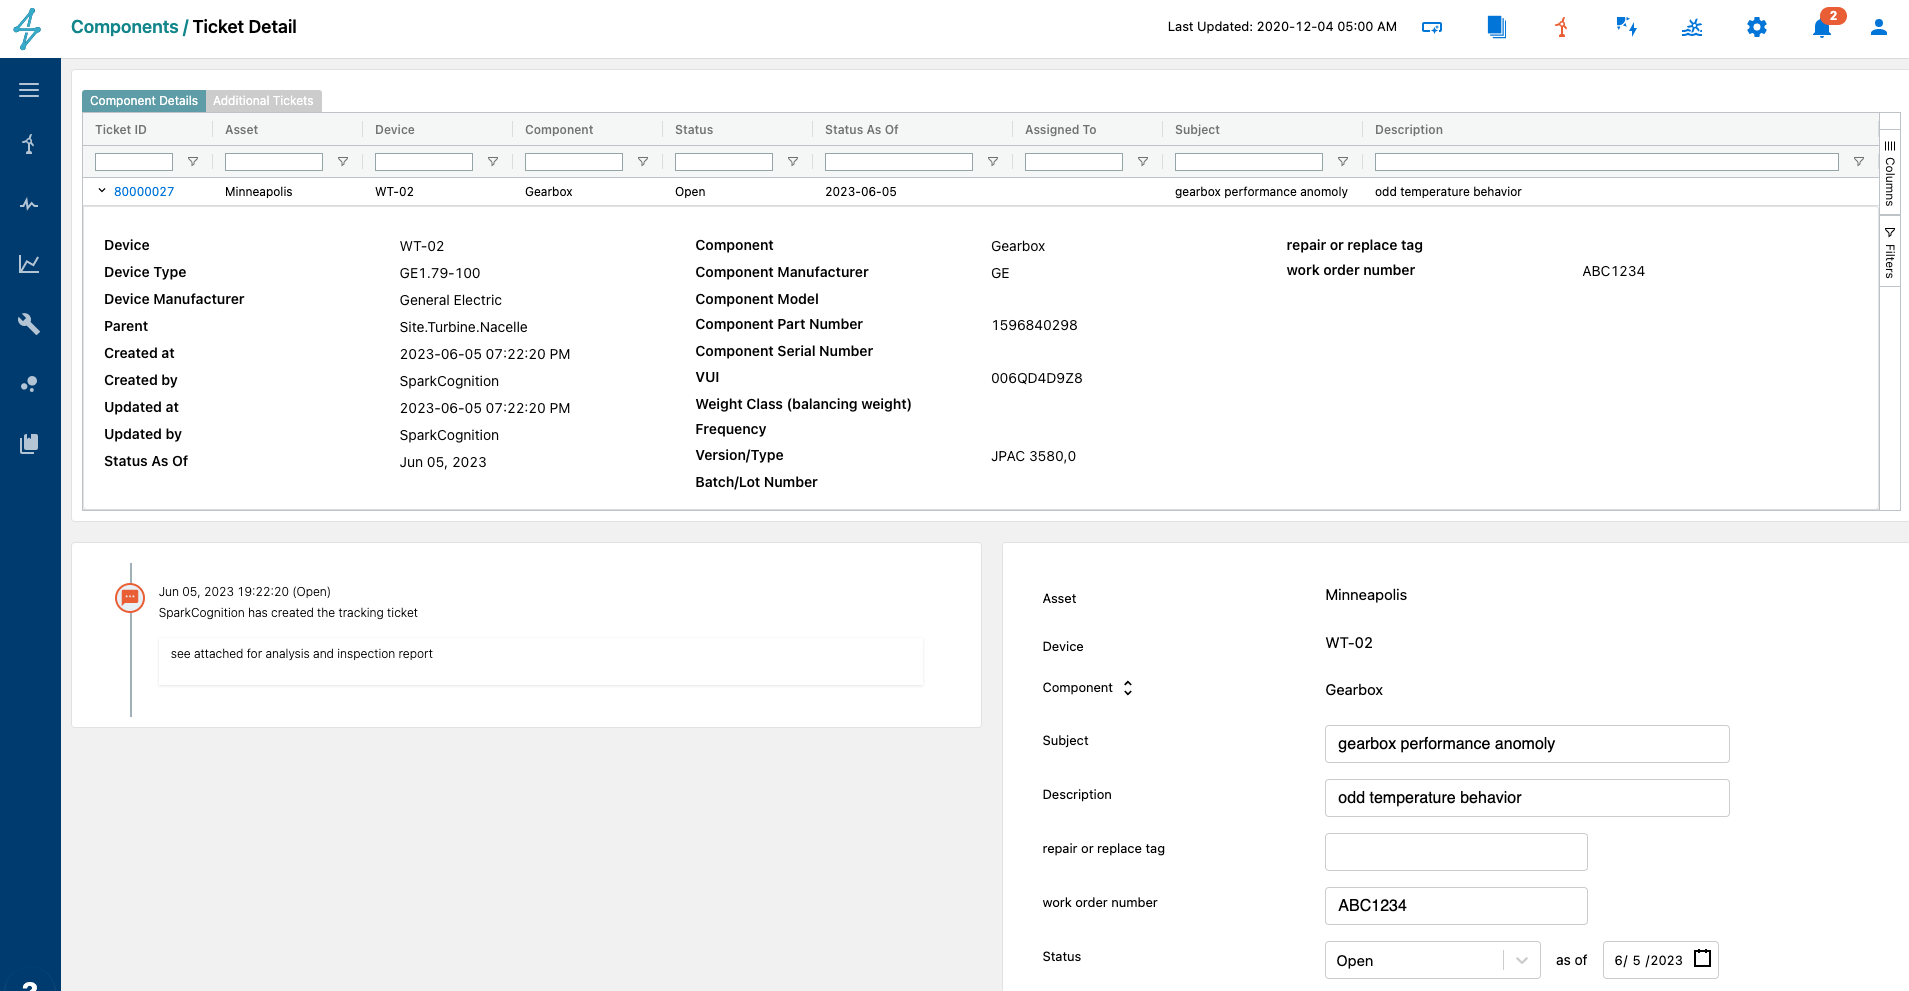
part 1 of a ticket record. Includes the summary of the ticket similar and then the editable fields on the right and history notes log on the left
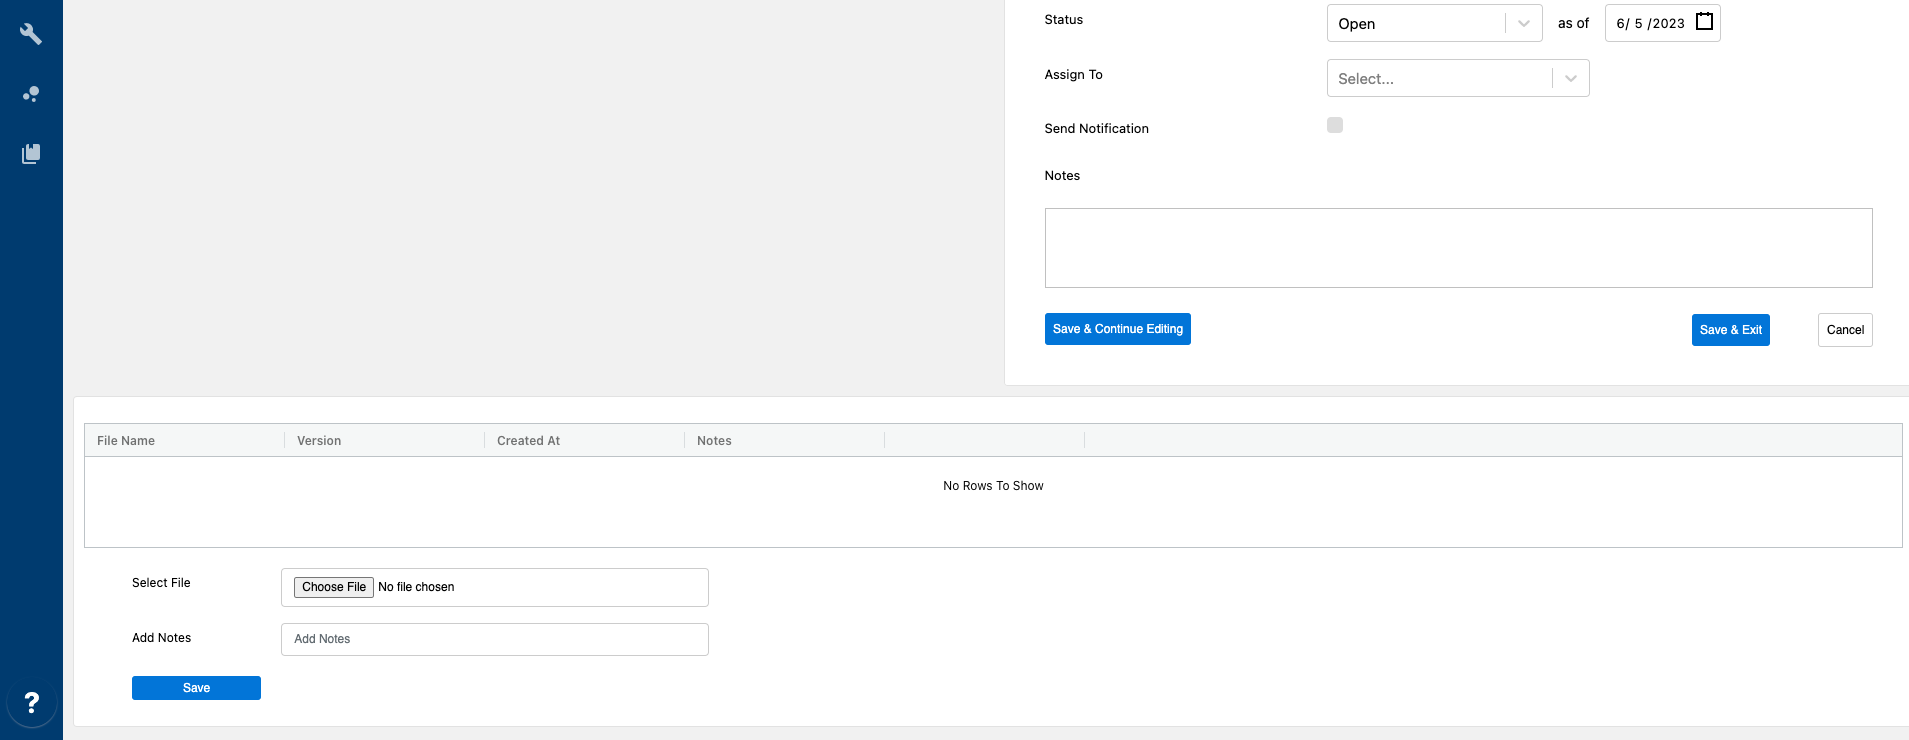
part 2 of a ticket record. Includes the remaining editable fields and the attachment.
You can make edits to the components by expanding the component section and using the pencil button similar to as described above when creating a new ticket.
When a new ticket is opened, the status is set to Open by default as of the date the ticket was opened. If the issue was found a week before the ticket was opened in the system, a user can backdate the status as of date so that it reflects when the event happened. Accurate reporting of status changes can help with statistics about how long it took to diagnose, repair, or replace components or how long it took to manage the workflow for process improvement efforts. Status options are: Open, on hold, closed resolved, closed unresolved, and review, repair, approval, replace each with pending, in progress, and completed options.
An example flow of a ticket would be:
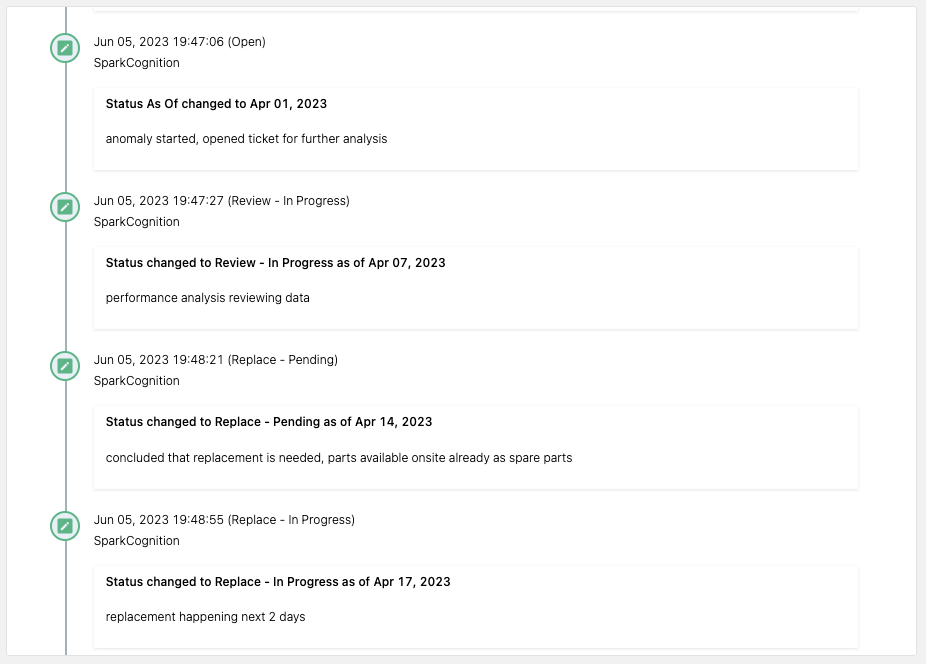
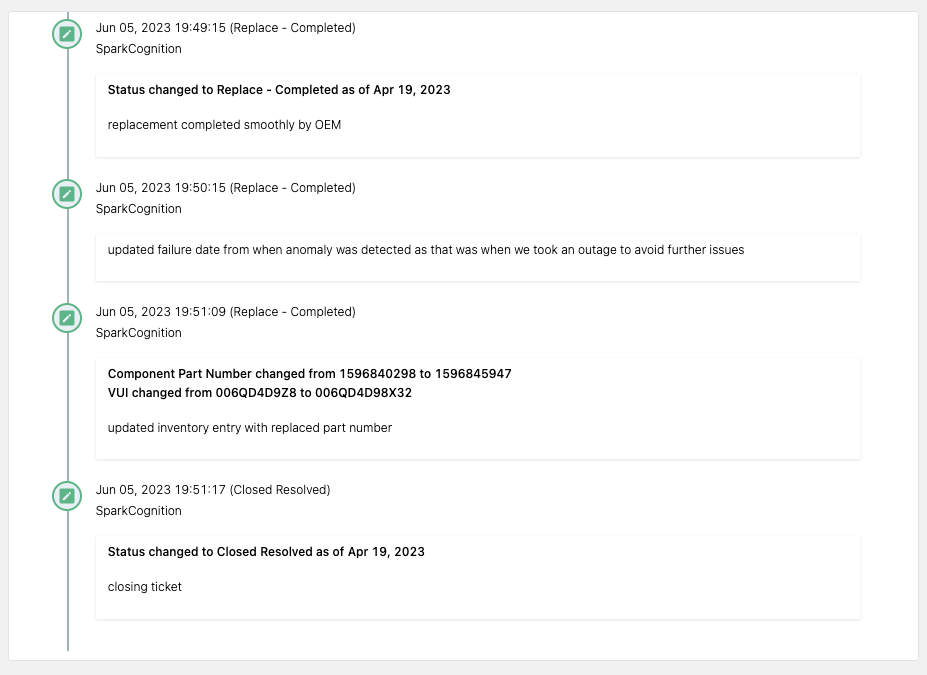
Notice in the above timeline that the status change as of date can reflect when the work was completed, backdated, even if the ticket was updated on a different day. The example ticket was created by SparkCognition, but if a user were to have updated it, the user's name would be recorded with the status change. Also notice that once there was a replacement needed, we updated the old component inventory information with the failure date so that that component record contains complete information about its end of life. After saving the old component information, we updated the component inventory data and assigned the new component with a new installed date that matched when it was replaced and cleared the other dates. That way there is a new record of the component installed for that device.
I can also see these changes of a replaced part reflected in the inventory page under the history.
Exporting Data
All tickets and inventory history are available through APIs or right clicking on tables to download information for further analysis and failure statistics.
